Showing posts with label garden decor. Show all posts

Monday, June 26, 2017

Painting a Basket of Pansies on a Rock

Painted rock of a basket of pansies by Cindy Thomas


YOU can paint a pretty basket of pansies similar to this with the guidance of Ernestina Gallina's free tutorial.


This is my interpretation of Ernestina's tutorial and the steps are explained below.

Steps for a painted rock basket of pansies by Cindy Thomas


Step 1: Choose your rock.

A good shape for this project is round or oval. The rock I chose is oval and measures 3 inches x 5 inches.


Step 2: Paint the lower half of the rock with dark brown.

I chose a hue called "burnt umber" for the lower half of my stone. (I used both crafter's acrylic and acrylic paint for this project.)


Step 3: Paint evenly-spaced horizontal strips in a lighter brown.

I used a hue called "burnt sienna." Tip: Before I painted the strips, I sketched them with a white pencil so I'd have guidelines to follow.


Step 4: Paint evenly-spaced vertical strips in the light brown hue.

After sketching the vertical lines with my white pencil, I used the same "burnt sienna" hue to paint evenly-spaced, vertical strips. Tip: My vertical strips should have been painted closer together.


Step 5: Highlight A

I suggest you study Ernestina's tutorial before starting this step because it's a little tricky. I used a "terra cotta" hue and carefully placed alternating swatches of this color where my horizontal and vertical lines met. Tip: I practiced on paper before attempting to paint my rock.


Step 6: Highlight B

I used a "yellow ochre" hue and highlighted the horizontal and vertical terra cotta portions painted in Step 5.


Step 7: Highlight C

I mixed the yellow ochre hue with a little white acrylic paint and highlighted once again, trying to achieve an interlaced basket effect.


Step 8: Sketch the pansies.

I used my white pencil to sketch pansies on the upper portion of my rock. I placed them at different angles, made them different sizes, and placed some overlapping the basket.


Step 9: Paint pansy petals with white base coat.

When I base coated the pansies with white acrylic paint, I left the edges unpainted to set off the petals.
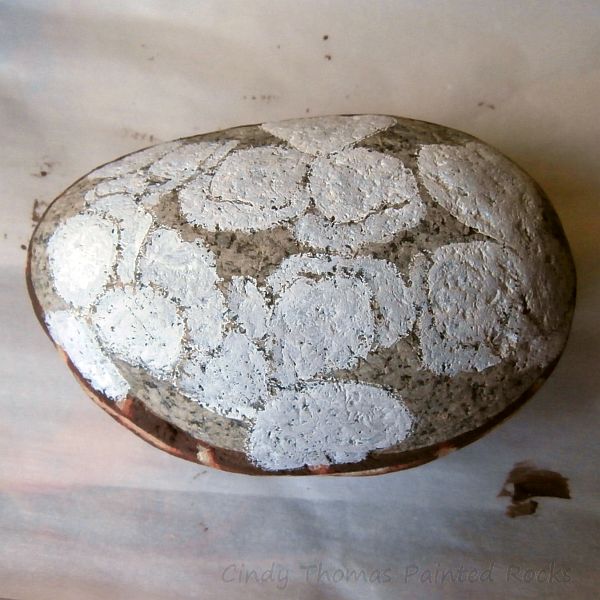


Step 10: Paint the empty space.

I first used a "leaf green" hue to paint my empty space but had to go back and repaint it later with "hunter green" which was a darker shade. Tip: Use a dark green hue for this step.


Step 11: Paint the flowers.

Instead of painting the pansies yellow as Ernestina explained in her tutorial, I referred to a photo with a different color combo. In general, pansies are painted lighter at the edges and darker in the center. Tip: I suggest you study Ernestina's tutorial to help you understand how to properly shade the pansy petals.


Step 12: Paint the leaves.

I used a "leaf green" hue to paint the leaves and mixed a little white with the green to outline and add veins to each leaf. (Note: I chose to omit the basket's handle on my basket of pansies.)

Painted Rock of Pansies in a Basket by Cindy Thomas

Pansies in a basket painted on a stone by Cindy Thomas


Step 13: Seal the stone with your preferred clear coat protection.

To seal my pansies in a basket painted rock, I brushed on a coat of Mod Podge, followed by a coat of Americana DuraClear Satin Varnish.


Helpful Links

  
© Cindy Thomas Painted Rocks

Friday, May 1, 2015

How I Transformed a Stone Bird Bath with Outdoor Acrylic Paints


A few years ago a dear friend gave me a bird bath which he primed with gray and black so I could paint it as I wished. This Spring I finally decided to add some color to the bird bath.


Since the shape of the bowl and base reminded me of a flower, I decided to use the "Ring of Fire" Sunflower as my inspiration.

Photo courtesy of All-America Selections

2001 AAS Flower Award Winner:
Sunflower 'Ring of Fire'
National Winner

I have used outdoor acrylic paints on my rocks and thought they would work just as well on this stone bird bath. Here are the paints I used. (My choice of brand was solely based on the color I desired and these are all 2 oz. bottles.)


  • Anita's Yard & Garden Durable Outdoor Paint - Marigold Garden
  • DecoArt Crafter's Acrylic All-Purpose Acrylic Paint - Burnt Umber (not pictured)
  • Anita's All Purpose Acrylic Craft Paint - Brick Red
  • DecoArt Patio Paint Outdoor - Orange Poppy
  • DecoArt Patio Paint Outdoor - Splendid Gold
  • DecoArt Patio Paint Outdoor - Sweet Pea
  • Anita's Yard & Garden Durable Outdoor Paint - Garden Gate White

Step 1

I did not want to take the time to re-prime the bird bath bowl. So, I first sanded the rough areas where the gray primer had worn away.


Step 2

I applied 4 coats of "Marigold Garden" (yellow) outdoor paint to cover the gray primer and added a brown center using "Burnt Umber" Crafter's Acrylic.


Step 3

To add a little pizazz, I painted a line of "Splendid Gold" Patio Paint around each petal shape.


Step 4

To paint the "ring of fire" around the brown center, I mixed "Orange Poppy" Patio Paint with "Brick Red" Acrylic Craft Paint and brushed strokes out from the center toward the petal shapes.

Next, I stroked lines over the reddish-orange "ring of fire" using the "Splendid Gold" and "Brick Red" paint.


Step 5

To finish up the bird bath bowl, I painted "Splendid Gold" around the brown center and dabbed the same color inside the brown circle. Lastly, I painted "Splendid Gold" ovals inside the petal shapes.


Step 6

Because the base was primed with black, I primed the petal shapes around the lower portion of the base with white outdoor paint. 

Next, I used the "Sweet Pea" (green) patio paint to cover the stem and leaf section of the base. Once I painted the light green hue over the base, the leaves sculpted in the stone base became more visible and I decided to leave them "as is" rather than detail them any further. 

"Splendid Gold" was painted around the top portion. (The very bottom remained the existing gray color.)


Step 7

Although I used paint formulated specifically for outdoor projects, I also sealed the bird bath base and bowl with 3 coats of Delta Ceramcoat Satin Exterior/Interior Varnish (a polyurethane sealer).


Here's a bird's eye view of the brightly-painted bird bath in the garden.


Tips & Ideas

One, 2-oz. bottle of paint (in the colors mentioned above) was enough to cover the bird bath with plenty left over for other projects.

Bird bath bowls can become slimy and icky. I've been told hydrogen peroxide can be used to clean the bowl. In addition, salt or baking soda can be used to scrub off the slime.

My solution to a slimy bird bath bowl is to place a plastic coffee can lid in the center. The lid is easily removed to toss the old water into the garden and add fresh water for the birds.


I also surround the plastic lid with stones as a perch for the birds. I have noticed my visiting birds prefer drinking over bathing. 


Useful Link

© Cindy Thomas Painted Rocks 

Thursday, September 11, 2014

How to Make "Gem" Stones

I wanted to make a garden ball but did not have an old bowling ball handy. Then it occurred to me, 

"Why not attach glass gems to rocks?"


So, I did a little experiment using a small, pitted rock and two different adhesives I had on hand:

E6000 Craft Adhesive


Pros: Once thoroughly dried, the E6000 had a good, tight seal and there were no globs around the base of the gem.

Glass gems attached with E6000 adhesive

Cons: It was smelly, messy and the gems slid out of place unless I held them until they set (around 15 minutes). To cover the entire rock, the E6000 would be very impractical. Who has the time to hold each gem in place until it sets?


GE Silicone II

Make sure to use the silicone which is waterproof, clear, and made for outdoors – either for gutters and flashing or windows and doors.


Pros: The silicone is thicker than E6000 and the gems stayed in place more easily (however, gravity may still cause some to slide). Even though my silicone was 1 year past the expiration date, it still held the gems and the smell was less intense than a fresh tube.

Glass gems added to pitted rock with silicone adhesive

Cons: Globs of silicone showed around the base of each gem and the adhesive stays somewhat rubbery when dried. The globs may be avoidable if the gems are tightly spaced or a smaller amount of silicone is used. A fresh tube of silicone will be smelly (like ammonia.)


My Preferences


For attaching gems to rocks: I will use the silicone. The stones didn't slide around as much (if at all). I could use the tube like decorating a cake and make designs on the rocks.

For attaching stones together: I will use the E6000. I think the hold would be much better and the look cleaner than blobs of silicone around the glued pieces.

For a more eye-catching "gem" stone: I'll paint the rock first.

Which adhesive held up better outdoors?  

This blog post will be updated in Spring 2015 after the "gem" stones have been outdoors and exposed to the sun, sprinklers, rain, snow, wind and dust.

In the meantime, the "gem" stones add bling to my garden. (But now the other rocks and pavers look oh, so boring.)

"Gem" Stones in the Garden

Update: Spring 2015


After being outdoors all Winter and exposed to wind, rain, dust, and snow, the "gem" stones held up beautifully. I took this photo after I removed them from the garden and just brushed off the red mulch. All the gems were still strongly attached on both the silicone and E6000 stones. And, the "gem" stones don't look much different then the day I originally placed them in the garden.

Photo Taken Spring 2015 - "Gem" Stones Are Fresh Out of the Garden
 
I'm definitely making more of these!

Useful Resources


© Cindy Thomas Painted Rocks

Thursday, May 29, 2014

Rock Painting Ideas: Flowers Painted on Rocks and Stones

I enjoy painting flowers on rocks because they look so pretty in a garden and make wonderful gifts any time of the year.

See more painted rocks for the garden


To get my creative juices flowing, I have a new Pinterest inspiration board. It features ideas and patterns for painting flowers on rocks, stones and pavers.

Ideas: Flowers Painted Rocks


There are many simple and realistic ways to paint flowers on rocks, stones or pavers. Painted flower rocks add color, interest, beauty and whimsy to your garden and are unique, eye-catching gifts which will always be in bloom.


* * * * *

Visit my Pinterest Rock Painting Ideas and Helps board for more tips, tricks, ideas, and patterns to use for painting rocks, stones and pebbles. 


© Cindy Thomas Painted Rocks

Monday, April 21, 2014

Rock Painting Ideas: Butterflies Painted on Rocks

I enjoy painting butterflies on rocks because of all the beautiful, bright colors I can use.

See how this rock was transformed into a Paisley butterfly

To help get my creative juices flowing, I have a new Pinterest inspiration board. It features ideas and patterns for painting butterflies on rocks, stones and pavers.

Ideas: Butterflies Rocks


There are many simple, whimsical ways you can paint a butterfly on a stone or paver. Painted butterfly rocks add color, interest, beauty and whimsy to your garden and are unique, eye-catching garden art gifts for a special friend.

* * * * *

Visit my Pinterest Rock Painting Ideas and Helps board for more tips, tricks, ideas, and patterns to use for painting rocks, stones and pebbles. 


 © Cindy Thomas Painted Rocks

Tuesday, February 25, 2014

Painted Rocks: Garden Critters Before & After


I was inspired by a true story to paint a mouse hitching a ride on the back of a frog. Note how each stone's shape and size were transformed into the frog and mouse. Read more about the frog and mouse painted rocks.

________________________________


Learn how I used "black glue" to paint a butterfly with a stained glass effect on this rock.

________________________________


I like to use the rock's natural shape and characteristics whenever possible as illustrated in this ladybug before and after photo.

________________________________


More before and after painted rocks

© Cindy Thomas Painted Rocks

Tuesday, May 28, 2013

Do You Need a Garden Decor Idea? Paint a Year-Round, Reversible Address Stone

Warm-weather address stone


Flowers painted on a concrete wall block are eye-catching during Spring and Summer.


Problem: this flowery address marker looks very out of place during cold, winter months. 


Solution: a reversible year-round address stone.

Reversible address stone suitable for both warm and cold months


I did not want to limit myself to a Christmas side for Winter. So, I painted one long and short side (and half the top) with green leaves; the other long and short side (and top half) are painted with holly leaves and berries.

For this project I used "yard and garden" acrylic paint specially formulated for outdoors. 

To seal the concrete wall block, I tried Outdoor Mod Podge for the first time. (I found the Mod Podge to be tacky and used a polyurethane sealer over the Mod Podge.)


Tips:
  • Think about where the address marker will be placed. This will help you decide how much of the design should be painted on the short sides and top (see photo below)
  • Be very careful when lifting/moving the concrete block - it will weigh approximately 20 pounds
  • Priming the concrete wall block first with a product like Kilz helps the paint go on smoother 
  • I sat the concrete block on an upended plastic kitty litter container while painting (see photo below)

  
Ideas: 
  • Paint one side with Autumn leaves and the other with poinsettias
  • Paint a holiday theme on one or both sides
  • Instead of painting house numbers, attach some purchased at a home improvement store
  • Instead of a concrete wall block, use a large rock that stands upright

Two concrete address markers - One is reversible

Why not welcome your guests with a personalized address stone suitable for display year round. 

© Cindy Thomas Painted Rocks