Sunday, December 3, 2017

How to Paint Baby Jesus on a Rock


Useful Links

Note: When you click on certain links in this post, I may receive a commission for the purchase of products. As an Amazon Associate I earn from qualifying purchases.

© Cindy Thomas Painted Rocks

Monday, November 6, 2017

Helpful Rock Painting Tools and Supplies

To paint a rock, all that's required is a rock, paintbrush and paint.


These are the helpful tools and supplies I use to create painted rocks. These products are not necessary but they are nice to have.


(Most of my rock painting tools and supplies are purchased at Hobby Lobby or Amazon.com. Occasionally, I'll find something at Walmart, Michael's or JoAnn's.)

Note: When you click on certain links in this post, I may receive a commission for the purchase of products. As an Amazon Associate I earn from qualifying purchases.


Primers


Gesso

I recently discovered gesso and now it's my go-to primer. In the past, I used white acrylic paint as a primer. Now I prefer gesso for it's coverage and "tooth".  You can learn more about gesso here.

Regular gesso is what I use to prime smooth stones.

Regular gesso on a smooth stone

Super heavy gesso is what I use to prime pitted stones.

Super heavy gesso on a pitted rock

The following photo illustrates the difference gesso can make in paint color intensity when used as a primer.

Note the paint color intensity on each stone based on no primer, white paint, and gesso 

Specialty Brushes


Nail Art Brush Set

This set of nail art brushes is helpful for getting the paint into tight spaces. Fingernails are a tiny canvas, so it follows that tools used for nail art would be suitable for rocks too. Learn more about nail art brushes here.


Not only do the nail art brushes get into tight spaces but they're also perfect for painting very small stones.


Script Liner Brush

I paint thin lines and detailing with this script liner brush. It took a little practice to get used to this long, thin brush, but it became my favorite once I did. It's important the paint consistency isn't too thick when using this type of brush for lines and details.


Note: When you click on certain links in this post, I may receive a commission for the purchase of products. As an Amazon Associate I earn from qualifying purchases.


Pens/Markers


Paint Pens - I use the extra fine point Posca paint markers for adding details and filling in small areas of my painted rocks. (The Posca pens are also available in bold point, medium point and fine point if you'd like to use them for larger areas.)


0.35mm Black Pen - I use this Pigma Micron 03 pen to add thin details and write on my stones. The line is thinner than the 08 Micron pen.

0.50mm Black Pen - I also use this Pigma Micron 08 pen to add details and write on my stones. The line size is slightly thicker than the 03 Micron pen.


(This 10-piece Micron pen set features a variety of sizes and shows the line width of each size.)

I used acrylic paint, Posca paint pens and the 03 and 08 Pigma Micron pens to create this owl.


Note: When you click on certain links in this post, I may receive a commission for the purchase of products. As an Amazon Associate I earn from qualifying purchases.


Miscellaneous Tools & Supplies


Paint Eraser/Clay Shaper Tool 

I use this two-sided, rubber nib paint eraser tool to wipe away mistakes while my acrylic paint is fresh. It's very handy when the area I've messed up is in a tight or small spot. Just remember, you have to be quick and erase the mistake before the paint dries. Learn more about correcting rock painting mistakes here.


Embossing-Stylus Set

I originally purchased this 3-piece stylus set for tracing a design onto a rock with graphite transfer paper. Now the set does double duty as my dotting tools.


All of the dots on this heart were painted with the 3-piece stylus set.


Graphite Transfer Paper

I use graphite transfer paper to trace a design onto a stone.


For dark stones, white graphite transfer paper is used. And gray graphite transfer paper is used for light-colored stones.


Adhesive Glue

People often ask "what's the best glue for attaching rocks together." I have found E6000 glue to be the best-holding glue to secure painted/unpainted rocks to each other.


E6000 glue was used to attach the snowman's head to his melting body. Learn how to make a melting snowman painted rock here.

How to make a melting snowman painted rock
Brush Conditioner

Painting rocks can be tough on brushes. I clean my brushes with soap and water then condition them with Pink Soap to extend their life. A little goes a long way and a bottle lasts for quite awhile.


When you have the right tool, the task is easier. These are my helpful, rock painting tools and supplies which assist in the creation of unique, painted rocks art.

Note: When you click on certain links in this post, I may receive a commission for the purchase of products. As an Amazon Associate I earn from qualifying purchases.

Helpful Links

Regular gesso
Super heavy gesso
15-Piece nail art brush set
Script liner brush
Posca paint pens (extra fine point)
Posca paint pens (fine point)
Posca paint pens (medium point)
Posca paint pens (bold point)
Pigma micron 03 pen
Pigma micron 08 pen
10-piece Pigma micron pen set
Paint eraser
3-Piece stylus set
Gray graphite transfer paper
White graphite transfer paper
E6000 glue
Pink soap

© Cindy Thomas Painted Rocks

Saturday, August 19, 2017

Is Gesso a Good Primer for Painted Rocks?

Yes, in my opinion gesso is an excellent primer for painted rocks.


Gesso (pronounced jes-oh) is used to prepare a canvas for painting. (If you would like to know more about gesso, this article "What is Gesso and How is it Used in Painting?" is very informative.) 

I've been hearing about gesso used to prime rocks (my canvas) and thought I'd give it a try instead of the usual white, acrylic paint.

For my experiment, I purchased two types of gesso from the Michaels.com website...
  • Regular - Folk Art brand
  • Super Heavy - Liquitex brand

...and selected a smooth stone for the regular gesso and a pitted stone for the super heavy gesso.

My process:
  • Brush one coat of each type of gesso on a stone (regular gesso on the smooth stone, super heavy gesso on the pitted rock)
  • Paint the same design on each stone using one coat of various brands of acrylic or acrylic craft paint
  • Use an art pen for thin details
  • Seal the stones

Gesso features and performance:
  • Folk Art - regular gesso
    • Consistency of toothpaste
    • Applied with a brush easily and smoothly
    • A little went a long way
    • Covers well
    • Can be mixed with acrylic paint for a colored base coat
    • Soap and water clean up
    • Quick drying
Regular gesso applied to a smooth stone

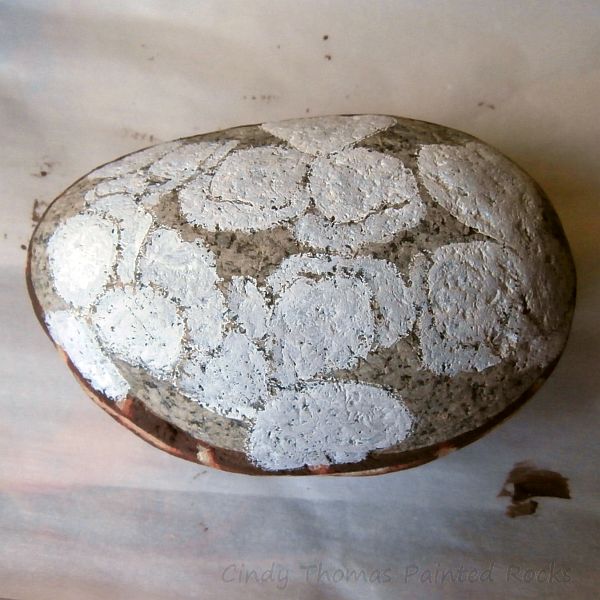
  • Liquitex Super Heavy gesso
    • Consistency of cake icing or spackling compound
    • Somewhat messy
    • Applied with a brush and required smoothing in different directions
    • Can be tinted with acrylic paint
    • Soap and water clean up
    • 24 hours to dry
    • Brighter white than the regular gesso
Super heavy gesso applied to a pitted rock


Paint colors and brands used:
  • Craft Acrylic (craft acrylic is a thinner consistency than regular acrylic paint)
    • Anita's Orange
    • Anita's Christmas Green
    • DecoArt Cherry Blossom Pink
  • Acrylic
    • Americana Snow (Titanium) White
    • Apple Barrel Bimini Blue (turquoise)
    • Apple Barrel Red
    • Apple Barrel Lime Tree
    • Apple Barrel Black
    • Folk Art Sky Mist (light blue)
 
The acrylic and acrylic craft paint colors adhered very well with both types of gesso. The brush moved smoothly across each rock's surface.

Results of one coat of paint applied over each type of gesso

There were no problems using the art pen on the gessoed and painted stones. In fact, the pen drew especially well on the pitted stone primed with super heavy gesso.

Results of art pen used on gessoed and painted stones (Sehnaz Bac design with permission)

My final photo clearly illustrates the benefits of using white acrylic paint or gesso as a primer for a stone. The paint colors on all three primed stones are brighter than the unprimed stone. The difference is most apparent when you compare the orange hue on each painted rock.

Results of no primer vs. acrylic paint and gesso primers (Sehnaz Bac design with permission)

© Cindy Thomas Painted Rocks

Monday, June 26, 2017

Painting a Basket of Pansies on a Rock

Painted rock of a basket of pansies by Cindy Thomas


YOU can paint a pretty basket of pansies similar to this with the guidance of Ernestina Gallina's free tutorial.


This is my interpretation of Ernestina's tutorial and the steps are explained below.

Steps for a painted rock basket of pansies by Cindy Thomas


Step 1: Choose your rock.

A good shape for this project is round or oval. The rock I chose is oval and measures 3 inches x 5 inches.


Step 2: Paint the lower half of the rock with dark brown.

I chose a hue called "burnt umber" for the lower half of my stone. (I used both crafter's acrylic and acrylic paint for this project.)


Step 3: Paint evenly-spaced horizontal strips in a lighter brown.

I used a hue called "burnt sienna." Tip: Before I painted the strips, I sketched them with a white pencil so I'd have guidelines to follow.


Step 4: Paint evenly-spaced vertical strips in the light brown hue.

After sketching the vertical lines with my white pencil, I used the same "burnt sienna" hue to paint evenly-spaced, vertical strips. Tip: My vertical strips should have been painted closer together.


Step 5: Highlight A

I suggest you study Ernestina's tutorial before starting this step because it's a little tricky. I used a "terra cotta" hue and carefully placed alternating swatches of this color where my horizontal and vertical lines met. Tip: I practiced on paper before attempting to paint my rock.


Step 6: Highlight B

I used a "yellow ochre" hue and highlighted the horizontal and vertical terra cotta portions painted in Step 5.


Step 7: Highlight C

I mixed the yellow ochre hue with a little white acrylic paint and highlighted once again, trying to achieve an interlaced basket effect.


Step 8: Sketch the pansies.

I used my white pencil to sketch pansies on the upper portion of my rock. I placed them at different angles, made them different sizes, and placed some overlapping the basket.


Step 9: Paint pansy petals with white base coat.

When I base coated the pansies with white acrylic paint, I left the edges unpainted to set off the petals.


Step 10: Paint the empty space.

I first used a "leaf green" hue to paint my empty space but had to go back and repaint it later with "hunter green" which was a darker shade. Tip: Use a dark green hue for this step.


Step 11: Paint the flowers.

Instead of painting the pansies yellow as Ernestina explained in her tutorial, I referred to a photo with a different color combo. In general, pansies are painted lighter at the edges and darker in the center. Tip: I suggest you study Ernestina's tutorial to help you understand how to properly shade the pansy petals.


Step 12: Paint the leaves.

I used a "leaf green" hue to paint the leaves and mixed a little white with the green to outline and add veins to each leaf. (Note: I chose to omit the basket's handle on my basket of pansies.)

Painted Rock of Pansies in a Basket by Cindy Thomas

Pansies in a basket painted on a stone by Cindy Thomas


Step 13: Seal the stone with your preferred clear coat protection.

To seal my pansies in a basket painted rock, I brushed on a coat of Mod Podge, followed by a coat of Americana DuraClear Satin Varnish.


Helpful Links

  
© Cindy Thomas Painted Rocks