Saturday, December 29, 2012

How to Make Paint Palettes Using Everyday Household Items

Here's how to easily make paint palettes from items you use every day around the house. And you're reusing an item that was headed for the trash anyway.

Use plastic lids from margarine tubs, yogurt cups, coffee cans, etc.

rock painting, palette, idea, DIY
Lid from a 32 ounce yogurt container


Use plastic bottles - any size works. In some cases this may not be cost-free, as you're losing the bottle deposit. I used a 2-liter seltzer bottle.

2-Liter Seltzer Bottle


Cut the bottom off the plastic bottle. (I was able to use regular scissors to cut around the bottom of my seltzer bottle.)


You now have a paint palette which is best for using individual colors without mixing. This works especially well when painting with children.

rock painting, idea, palette, soda bottle, DIY
Soda Bottle Paint Palette


I drink more water than soda and found my favorite palette is made from plastic 1-gallon water jugs.

Plastic 1-Gallon Water Jug

Similar to the soda bottle, just cut the bottom off the jug.


I love these paint palettes made from plastic water jugs because the colors can be mixed yet there's a divider if you want to keep them separated.
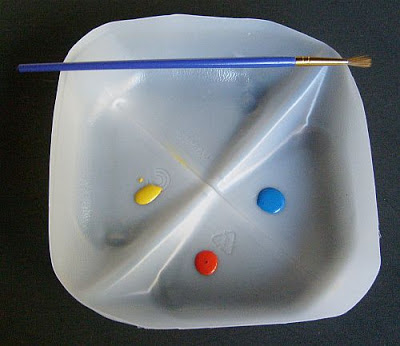
rock painting, idea, palette, water jug
Water Jug Paint Palette - My Favorite


If you have ideas for other inexpensive, DIY paint palettes, please leave a comment.


© Cindy Thomas Painted Rocks

Wednesday, December 12, 2012

How to Improve Your Drawing Skills


I believe the more you create, the more creative you become.


An important element to creating painted rocks is being able to sketch the design first and here are 5 things to remember when you are drawing.


WE Design Studios believes everyone is a creative genius and have graciously shared these drawing tips.

If you remember and practice these 5 drawing tips:
  1. Step back
  2. Draw what you see
  3. Consider composition
  4. Be patient
  5. Enjoy the process

...you will 
  • Improve your rock painting
  • Become more creative
  • Find inspiration in unexpected places.

More drawing tips: Painting Rocks - Gaining Confidence and Skill.

Learn, practice, get creative and rock on!

Tuesday, December 11, 2012

Can't Find Rocks to Paint?

Some of us have an easier time finding rocks to paint than others and now that winter weather is setting in, who wants to scrounge around outdoors for stones?


Tip: Visit the Garden Department of your local stores
  • Walmart
  • Home Depot
  • Lowes
  • etc. 
to see if they have any landscaping pebbles, stones, or rocks they want to get rid of.


On a recent trip to my local Walmart, I discovered many torn bags of landscaping stones stacked near the Garden Center. When I inquired about them, I was told the torn bags were being returned for a credit, however, if I wished to purchase some, I could do so for 1/2 price.

Tip: Try to negotiate for a discount if you live in an area where winter is setting in and landscaping is the last thing on a homeowner's mind. 


These decorative, landscaping stones are the type of rocks which make my eyes light up:
  • Smooth
  • Unpolished
  • 2-3 inches in size
  • Various shapes

Here's just a small portion from the bag I purchased which have been washed and set out to dry.


Landscaping stones purchased for a discount at Walmart

Tip: Be aware that polished stones found in craft stores are pretty, however, paint doesn't adhere to them easily. It may require sanding, priming, and a few coats of paint if you use these type of store-bought pebbles.


Now I have a large supply of rocks, stones and pebbles to keep me busy painting during the winter while I'm stuck indoors.


Idea: If I paint rock garden decor, perhaps Spring will be here before I know it.


© Cindy Thomas Painted Rocks

Saturday, December 8, 2012

How to Paint a Santa Hat on Rocks and Stones

Just in time for the holidays I came across a rock that was perfect for painting this Santa hat.

painted rocks, rock painting, Christmas, Santa, hat, ideas

Step 1:  If you look closely, you can see how I drew a line around the bottom third of the stone and added a circle towards the middle right.

painted stones, stone painting, hat, Santa
Step 1 - Sketch simple hat design on stone

Step 2:  Next, I gave the stone a base coat in 2 different colors - yellow for the portions that will be painted red and a shade of blue for the sections that will be painted white. (To get the blue shade, I mixed medium blue with a touch of white and black acrylic paint).

painted rocks, rock painting, hat, idea
Step 2 - Add base coat of blue and yellow acrylic paint

Tip:  I discovered that a binder clip was a great tool for holding the stone so I could paint both sides at once.

painted rocks, ideas, binder clip, stones
A binder clip is a great tool for holding a thin stone while painting

Step 3:  Then I painted over the yellow base coat on both sides of the stone with red acrylic paint.

painted rocks, rock painting, Santa, hat, red
Step 3 - Apply red paint over yellow on both sides of stone

Step 4:  I added a dab of black paint to the red to get a maroon color and outlined the blue circle, added a couple of arcs from the circle to the top of the hat, and added a line between the blue and red along the bottom.

painted rocks, Santa, hat, rock painting, idea
Step 4: Outline and define

Step 5:  I achieved the fleecy texture by using a stiff, flat brush and dabbed on white paint, allowing some of the blue base coat to show through.

painted rocks, Santa, hat, fleece
Step 5: Dab on white paint for the fleece

Idea 1:  You can stop here or add finishing touches such as sealer and glitter.

painted rocks, stones, Santa, hat, Cindy Thomas
Three Variations - unsealed - sealed - glittered

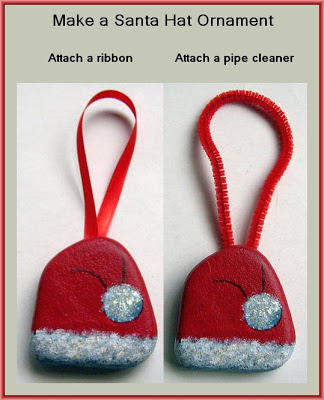
Idea 2:  Here's another idea for your painted stone: Add a ribbon or pipe cleaner and your painted Santa hat rock has now become a Christmas tree ornament.

painted rocks, Santa, hat, ornament, Cindy Thomas
Painted Rock Santa Hat Ornaments

Idea 3:  You can personalize the Santa hat by adding a name or slogan to the bottom, white portion.


Painted Santa hat rocks make cute DIY Christmas gifts that are easy enough for children to paint and fun for all ages to give and receive.


© Cindy Thomas Painted Rocks

Sunday, December 2, 2012

Sweet, Simple Gifts - No-Fat Rock Candies

Painted rock candies are a sweet gift to have on hand around the holidays and very easy to paint.

painted rocks, candy, candies, chocolate, Cindy Thomas


Quick How-To Lesson for Painting Chocolate Candy Rocks


  • Small, round stones make the best rock candies.
  • Paint one (or both) sides of each stone with a milk, dark, or white chocolate acrylic paint color. For the majority of these stones I used burnt umber acrylic paint. The light one is painted with buttermilk acrylic and for the shiny stone on the lower right I used brown fabric paint. 
  • If you have stones that are naturally chocolate-colored, you don't need to paint them. FYI: The stone on the upper right is unpainted.

painted rocks, stones, acrylic paint, chocolate, candy
Paint the stones with chocolate-colored acrylics

  • You can start decorating the stones now or you can add a little shading around the sides of each stone by mixing the brown paint with a little black (or brown with the buttermilk color).
  • An internet search for chocolate candy images will give you ideas for how to decorate your candies
  • I made this tool for applying the little dots on the stones

painted rocks, tool, DIY, dotting, pencil, pin,
DIY Dotting Tool

  • Now use your imagination - dots, swirls, lines, squiggles, a combination of designs - anything goes.
  • 3-D Fabric paint is what gives the designs dimension and realism. I used white, butterscotch and brown fabric paint
  • You may want to practice using the 3-D fabric paint before applying it to the stones.

painted rocks, stones, candy, chocolate, designs, Cindy Thomas
Add designs to the chocolate-colored stones


The painted rock candies will look even more realistic if you display them in a festive holiday dish...

painted rocks, candy, chocolate, festive, bowl, Cindy Thomas

...or a bowl.

painted rocks, chocolate, candy, bowl, Cindy Thomas
 

A few more gift-giving ideas: 
  • Adorn wrapped packages with a candy or two
  • Gift a few individual candies
  • Place a few rock candies in a Christmas stocking
  • Attach a ribbon to make a Christmas ornament
  • Create a unique and/or personalized gift by packaging the candies in a dish, bowl, mug, etc.
  • Painted rock candies make great gifts for Valentine's Day too.

Please, please, please remember to keep these candies away from young children. They can be very tempting and dangerous if ANYONE attempts to eat them.


Note: This idea was adapted from and inspired by Suzi Chua.


© Cindy Thomas Painted Rocks