
Problem: Many of my rock painting projects, especially nativity scene figures, require upright stones which are difficult to find.

Solution: Add wood filler to the stone's bottom to make a base.
How I Make Unpainted Rocks Stand Upright
Supplies Needed:
- rocks (clean and dry)
- newspaper to protect your work surface
- stainable/paintable wood filler
- disposable rubber gloves
- wax paper for testing wood filler base
- egg carton (or something similar for drying the wood filler)
- medium sand paper
- white acrylic paint

Wood filler is a putty-like product available in tubes or tubs. Having worked with both, I like the small tub because it is easy to remove a glob for rocks and it isn't as wasteful as the larger tub which will eventually dry out if not used. It is important you use the paintable version. (If you want to experiment first, go ahead and get the tube which will be cheaper.)

Be sure to protect your work surface with newspaper. I also use wax paper to minimize the wood filler sticking to the newspaper. This is a messy project. Disposable gloves are very useful when working with wood filler.
Step 1
Choose a stone you'd like to stand upright and look at it from all angles to see if there is a semi-flat area you can mold wood filler onto so it will form a flat base.
You can add just a bit of wood filler or pile it on - whichever achieves the most stable base for the rock.
Alternatively, if you have a rounded stone, choose which side you'd like to use for a stable base.
Step 2
Wearing disposable gloves, start applying wood filler to the bottom of your stone, smoothing with your finger as you go.
You want to build up the bottom and smooth the edges so they blend nicely into the stone. (Slightly wetting your finger helps the final smoothing and blending process.)
To test the stone's ability to stand upright, I sit it on wax paper for just a second. Because the stone is heavier than the wet wood filler, if left standing too long the wood filler loses its shape and starts spreading.
Step 3
Place the stone(s) with the wet, wood filler base upside down in an egg carton or something similar so the shape is retained while drying. It will take 2-8 hours for the wood filler to dry.

Step 4
Once the wood filler has dried, use medium sandpaper to lightly sand where the wood filler meets the stone to get as smooth a surface as possible. The goal is for the wood filler to be a part of the stone. Now is the time to also sand off any wood filler accidentally applied to other areas of the stone.

Step 5
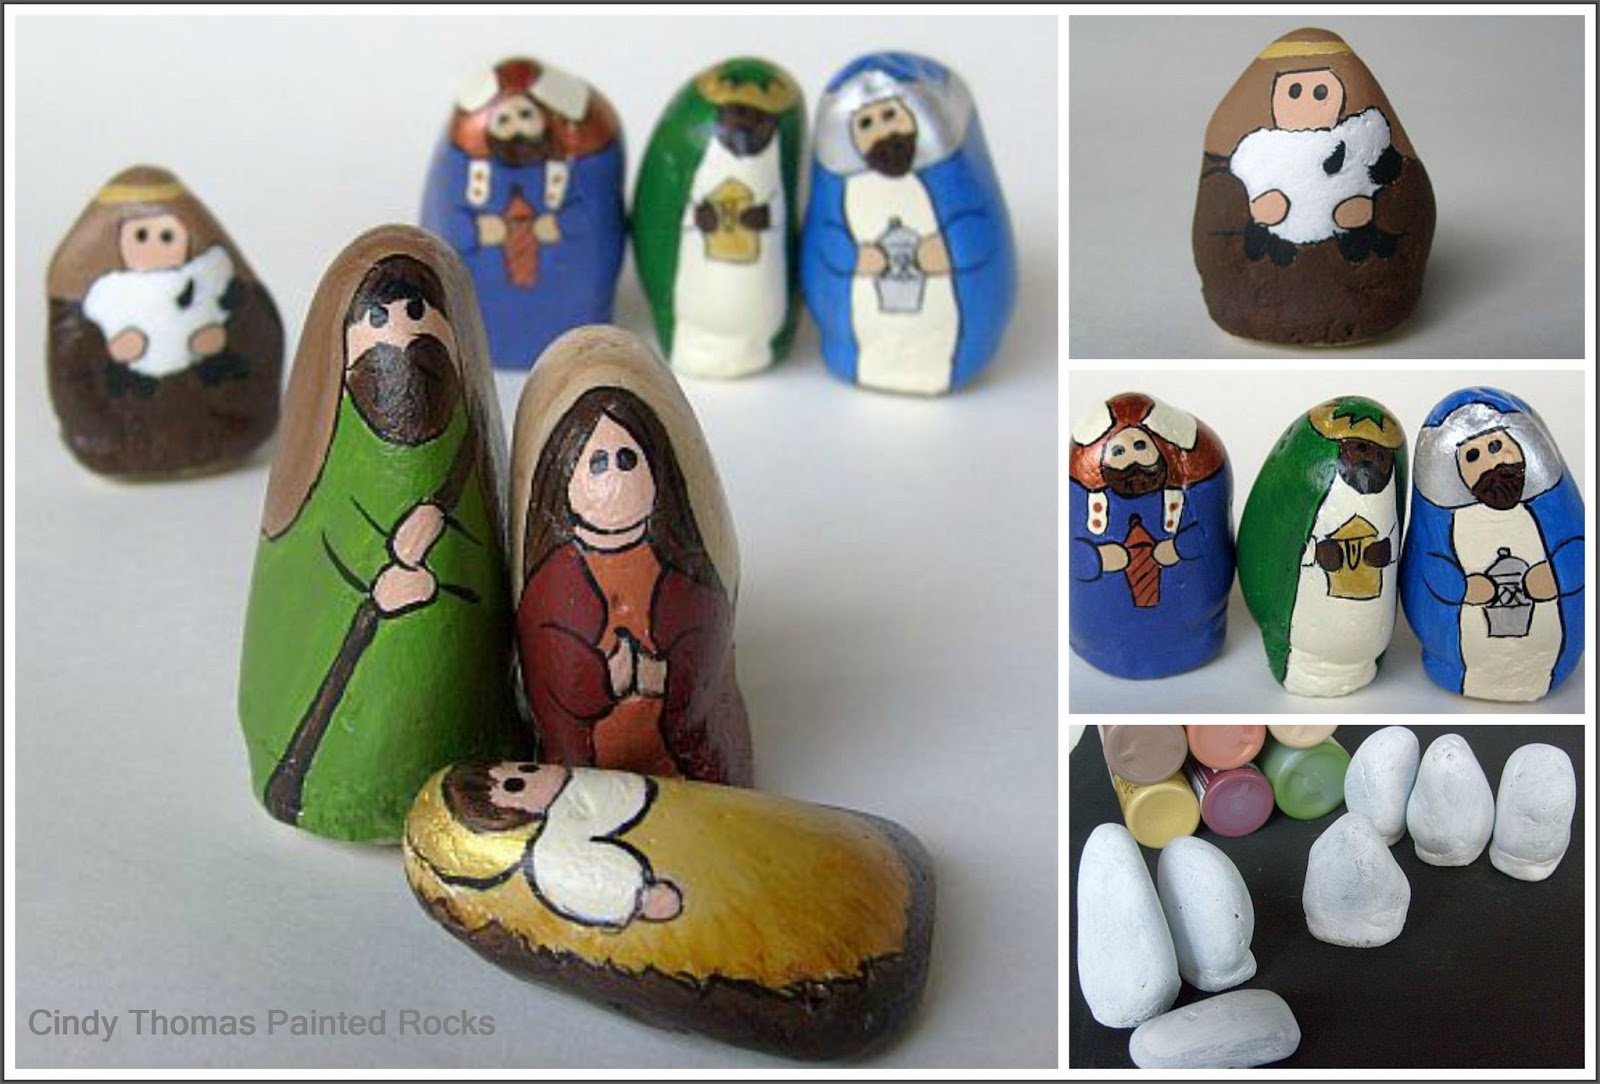
Apply white or other acrylic paint color of your choosing to the stones to cover the wood filler and prepare the surface for painting. Note how some of my stones are smoother than others where the wood filler has been applied.

Tips
- A Popsicle stick works well for spreading the wood filler onto the rock.
- So upright rocks are available when I need them, I like to add a wood filler base to many stones at one time rather than one here and there.
- You can use wood filler to repair chipped or dented stones
- If you plan to paint a bird on your upright stone, create a nest with the wood filler (since you're adding it anyway) and use a sharp tool to etch the twigs, leaves, etc.
- If you want the rock to stand without using wood filler, grind the base just a little with an electrical grinder. (Thanks Suzi Chua for these last three tips.)

* * *
I painted these nativity scene figures using stones which were stabilized on the bottom with wood filler.
Wood filler instructions - photo only version
© Cindy Thomas Painted Rocks
Useful Links:
Stainable Wood Filler - 3.25 oz. tube
Stainable Wood Filler - 4 oz. tub
Stainable Wood Filler - 16 oz. tub
Note: When you click on certain links in this post, I may receive a commission for the purchase of products. As an Amazon Associate I earn from qualifying purchases.
Useful Links:
Stainable Wood Filler - 3.25 oz. tube
Stainable Wood Filler - 4 oz. tub
Stainable Wood Filler - 16 oz. tub
Note: When you click on certain links in this post, I may receive a commission for the purchase of products. As an Amazon Associate I earn from qualifying purchases.
great
ReplyDeleteThanks, Yaya Yo.
DeleteThese tips are terrific. Thank you for sharing them!!
DeleteYou're so very welcome, Joyce.
DeleteThanks for the hints and tips. Can't wait to try my hand at rock painting.
ReplyDeleteI'm glad to hear you appreciate the rock painting tips and tricks I share, BrendaLea. Be forewarned - once you start painting rocks, you might not be able to stop. :-)
DeleteThat's the truth, I haven't stoped since I started. One of my grandsons wants to paint every time he comes over,lol. It's a lot of fun, no matter what they look like. But your rocks are beautiful!
DeleteThanks for the compliment, Chris T. Painting rocks is a great family activity. I like finding the stones almost as much as painting them.
DeleteYou're so welcome, Hicham. I'm so glad you found the information useful. Welcome to the wonderful world of rock painting.
ReplyDeleteThey are outstanding! thank you so much for the tutorials
ReplyDeleteYou're so very welcome, Gail. Thanks for letting me know you find the tutorials helpful.
DeleteJust found your site, I am just looking into rock painting. I am completely hooked, even drooling, and will read every page! Thanks for all the info, I can't wait to begin my nativity scene for my sister!
ReplyDeleteWelcome to the fun world of rock painting and my blog. I'm happy to share my painted rock tips and experiences with you and others. Your sister will be thrilled with the nativity scene you're painting for her.
DeleteThis is an awesome site! Check out the FB page "901 rocks!" 2 women started painting and hiding rocks around the city of Memphis and started the FB page leaving clues as to where to find. Now its spread to several thousand members. My son found his first few yesterday and now we are attempting to paint our own. Great family time creating and finding! Wish us luck as I am NOT artistic!! Great blog!!
ReplyDeleteThanks for the compliment, Jenna. Painting rocks and hiding them has become quite popular and fun. I'll definitely check out the "901 rocks" page on FB. I think it's great you and your son can share this hobby. And you don't have to be artistic to paint a rock! :-) Happy rock painting to you both.
Deletehi Cindy, Ive been painting rocks for awhile and Im addicted, can't wait to start trying the bases. But I have one questions, I leave my rocks outside, so is this filler waterproof?
ReplyDeleteHi. I have never used the wood filler on rocks left outdoors so I can't give you a good answer to your question. My suggestion would be to test the wood filler on one outdoor rock to see how waterproof it really is.
DeleteHi Cindy, I love painting rocks / stones for quite a while, but they were always the ones laying down. I bought some Wood Filler the other day but when I put it on the rocks and stand them to dry, the filler slides down the sides. The filler just won't hold a surface where I put it. I only use a little bit of water on my finger to smooth it out, but then I have peaks that stick out everywhere. What am I doing wrong? The more filler I put on the more it slides ...
ReplyDeleteThanks, Yvette
Hi mtnchild. I'm sorry to hear you're having difficulty with the wood filler. I have never experienced the wood filler sliding but the problem could be the stones are too slippery or smooth for the wood filler to adhere. You might try base coating the stones with acrylic paint first (allowing it to thoroughly dry) so the wood filler has something to adhere to. As for the peaks that stick out everywhere, once the wood filler dries you can use sand paper to smooth them out.
DeleteThank you Cindy. I will try painting Gesso on the bottom of the rocks before using the putty/filler. Gesso is good for "tooth". I purchased my rock from a Home Improvement center in the landscaping section, and yes they are pretty smooth to begin with. I'll try the Gesso and will let you know. Thanks again for your answer. Yvette
DeleteYou're welcome, Yvette. And I'd love to hear how the Gesso works for you.
DeleteAloha Cindy:
ReplyDeleteI'm so excited to get into the rock painting scene. Mahalo for all the helpful hints. I painted a couple of stones (snagged from my husband's garden) using white acrylic paint as a base. Still need to practice my artistic skills but I like the ideas you have put forth. Mahal again...
Aloha and welcome to the fun world of rock painting. Thank you so much for letting me know you appreciate my helpful tips. I'm happy to share what I have learned (and continue to learn) about painted rocks.
DeleteHi, I, too am obsessed with painting rocks, and will be giving them as gifts, save the best :) and hide them around the harder parts of town. Question: How thick is the putty when you open the carton? - LOVE your pages!
ReplyDeleteHi Polly. Thanks for letting me know you love my pages. My wood putty is the consistency of whipped cream cheese. It may dry out in the container after it's opened and you can try adding a little water to loosen it up if that happens to you. I've learned to purchase a small container so there's less chance of the putty drying out before I can use it.
DeleteOnce the rocks have been painted can you put a sealer on them for outdoor use?
ReplyDeleteYes, most definitely, put a sealer on them after painting - whether they remain indoors or outdoors. However, be aware that no sealer will protect the painted rock permanently outdoors. On occasion you will have to check the rock and apply more sealer if weather is affecting the paint.
DeleteHere are my stoneart works instagram.com/marybravery
ReplyDeleteYou are welcome :)
Thank you for sharing your painted stones, Mary. I like your unique style.
DeleteYou have no idea how you have helped me with my rock painting project. Someone donated hundreds of stones for a project I am working on, and many of these rocks needed a little fixing. Your tips on how to shape them with wood filler came in like a blessing from heaven. Thank you, thank you very much.
ReplyDeleteThat sounds like a very big project you're working on! I'm very happy to hear my tip rescued you in your time of need and appreciate you taking the time to comment.
DeleteWhat a wonderfully informative site. I am excited about making some painted rock of my own. You are inspiring AND helpful.
ReplyDeleteThanks for the compliments, Lois. If you're like me, once you paint some rocks, you'll be hooked and won't be able to stop! Happy rock painting.
DeleteThank you for sharing this. You inspire me to try this. You have a great site.
ReplyDeleteYou're welcome. Thanks for letting me know you've been inspired and like my blog.
DeleteI am just starting to learn about rock painting. I am so glad I found you through Pinterest. What is your blog so that I can follow you. You have such a great way of explaining things, very easy to follow. Thank you so much for sharing what you do, Cindy. One question...how much artistic talent do you need to paint on the rocks? Do you trace an outline first or freehand? I'm not very artistic so where is a good source for tracing designs? Thanks again!
ReplyDeleteWelcome to the fun world of rock painting, Cathy. I'm happy you found me too.
DeleteThis is my blog address: http://paintingrocks.blogspot.com/
You don't need artistic talent to paint on rocks. I have both traced and drawn freehand on my rocks. Any design can be traced onto a rock using this technique: http://paintingrocks.blogspot.com/2013/07/rock-painting-technique-pattern-tracing.html
Here's a blog post I wrote about a painted rock design which requires no drawing skills: http://paintingrocks.blogspot.com/2013/04/painted-rocks-no-drawing-skills-required.html
I've found the more rocks I paint, the better I get at it.
this is cool stuff. thanks.
ReplyDeleteYou're welcome, Dora.
DeleteI am a little concerned about the durability of the filler. Will it stay on?
ReplyDeleteThanks
Beata - in my experience the wood filler does stay on. I believe the paint along with the sealers I use help the filler stay on the stone.
Delete