 |
| Pine Cone and Painted Stone Christmas Tree |
Step 1: I cleaned the dirt, pine needles, etc. from the pine cone. If you prefer, you can wash and preserve the pine cone before starting this project.
Step 2: I went through my small stones and chose the rounded or oval ones.

Step 3: I narrowed down my selection of stones by fitting them on the scales of the pine cone. Some stones were too big, some too thick, and others fit nicely to maintain the Christmas tree shape.
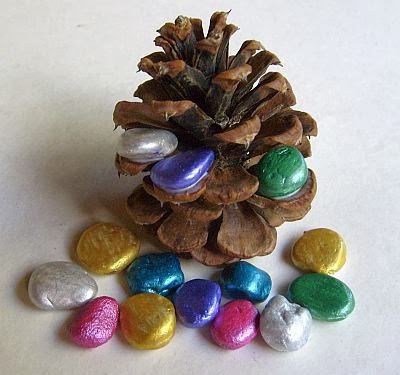
Step 4: I painted my chosen stones with white acrylic paint as a base to make the paint adhere better and my colors appear brighter.
Step 5: Metallic craft paint in various hues - gold, silver, copper, emerald, topaz, amethyst, rose - was applied to the primed stones.
Note: When you click on certain links in this post, I may receive a commission for the purchase of products. As an Amazon Associate I earn from qualifying purchases.

 |
| Painted Stones Become Ornaments on a Pine Cone Tree |
Tips
- ALWAYS keep small stones away from children - they are a choking hazard!
- Use a toothbrush or bottle brush to clean the pine cones.
- Always test the placement of the stones to avoid the pine cone being tipsy.
- If using multiple colors, take care of the placement so you don't have the same colors bunched together.
- You may need to touch up the underside of the painted stones. Do it carefully so you don't get paint on the pine cone.
- E6000 or a similar glue should also work for this project.
- You can purchase small stones (in a bag) in the craft section of a dollar store.
Ideas
- Add glitter to the stones or edges of the pine cone. (I used glitter for the stone at the top to resemble a star.)

- Add a little white paint to the edge of the pine cone to resemble snow.
- Paint the pine cone instead of leaving it natural.
- Place the pine cone/stone Christmas tree in a painted clay pot (see photo above).
- Paint rectangular stones to resemble gifts under the tree.

- Switch up the colors for a Halloween, Thanksgiving, Easter, or other holiday/occasion.
- Use a pretty candle holder for a base. (I used a red, star-shaped candlestick.)


Useful Links
- How to clean and preserve pine cones
- Pine cones by the bag
- Small stones by the bag
- Metallic craft paint
- E600 Glue
- Mini pine cone pot tutorial
- How to paint a pine cone Christmas tree
© Cindy Thomas Painted Rocks
I am going to try this one for sure
ReplyDeleteGo for it, Carol!
Delete