Showing posts with label polished. Show all posts

Tuesday, April 2, 2013

Simple Rock Painting Idea for Polished Stones


My problem: Polished stones are difficult to paint because of the smooth, slick surface. (The paint doesn't want to adhere to the stone.)


My simple solution for some of the prettier, polished stones like the group pictured above:

 
Polished Stone Kitties


How to Paint Kitty Cats on Polished Stones


My supply of polished rocks included small stones with a perfect shape for a cat's face, as well as larger, colorful stones to use for the body.

Step 1: Choose a large and small stone that closely match in color. (Small triangular or round stones work well for the face; round or oval shapes work well for the body.)

Step 2: Glue the small stone onto the large stone using E-6000 glue (or similar craft adhesive).

Attach the face stone to the body with E-6000 glue

Step 3: After the glue has dried, use 3-D fabric paint in various colors to add simple details for the face and body.


3-D Fabric Paint


Add simple details to the face and body

Step 4: To keep the paint from flaking off the stone(s) you'll need to seal the rocks:
  • First coat: Mod Podge (an all-in-one glue, sealer and finish)
  • Second coat: Delta Ceramcoat Varnish (to avoid stickiness of Mod Podge in high humidity) 


Sealer 1: Mod Podge - Sealer 2: Delta Ceramcoat Varnish

Update: I used the brush-on sealers pictured above for the cats pictured. Since the time of this post, I still use Mod Podge as a first coat, but I now prefer Americana Duraclear Satin Varnish for my second coat.

Tips
  • Before gluing the polished stones together, sand the area where they'll be attached. This will help the glue adhere better
  • Apply the glue to each stone and wait approximately 2 minutes before attaching the stones together
  • Press the stones together for a few minutes to make sure you have a good hold. (Be watchful of the stone sliding rather than adhering.)
  • You can use a brush instead of the 3-D paint tip for applying the details. This may give you more control on smaller stones  


Ideas
  • Tie a ribbon around the cat's neck
  • Add a little bell on thin elastic around the kitty's neck
  • Use this idea for painting other critters on polished stones
  • Display your painted stone pets in little baskets or no-sew bedding

Painted Rock Pets

A PURRfect solution for polished stones!


© Cindy Thomas Painted Rocks

Tuesday, January 8, 2013

Year-Round Display for Painted Rock Nativity Sets Using Natural Elements

You learned the simple and easy way to display your painted rock nativity set.

Here's how to display painted rock nativity scene figures year round using natural elements such as a:
  • Piece of slate
  • Wooden bowl or plate

Idea 1: You'll need a piece of slate which has flat areas to accommodate all three nativity scene figures. Clean and dry the slate and place the painted nativity rocks on top. You now have a natural, easy, simple way to display your nativity set year round.

unique nativity sets, painted rocks, Cindy Thomas
Piece of Slate Used for a Natural Nativity Set Display


Idea 2: You'll need a wooden bowl or plate

Wooden salad bowl and charger plate

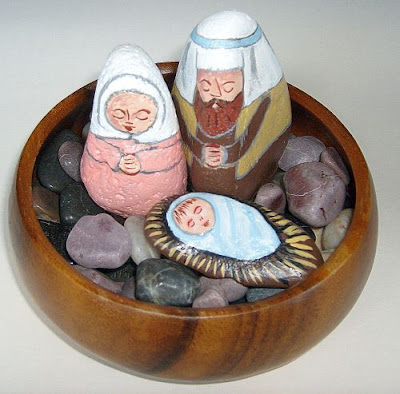
Fill the bowl with smooth stones and add the nativity figures...

unique nativity sets, painted rocks, Cindy Thomas
Wooden Bowl + Smooth Stones + Painted Rock Nativity = Natural Display


...or fill the plate loosely with smooth stones...


...rearrange the stones around the larger, Mary and Joseph nativity figures so they are sitting directly on the plate. Add the Baby Jesus nativity figure on top of the stones. 

unique nativity sets, painted rocks, Cindy Thomas
Wooden Plate + Smooth Stones + Painted Rock Nativity = Natural Display

Up next: Year-round, painted rock nativity set displays using candle accessories.


© Cindy Thomas Painted Rocks

Thursday, November 29, 2012

An Alternative Painting Idea for Polished Stones

You can buy bags of stones at craft and dollar stores. I found these for $1 each at Family Dollar.


However, in most cases the stones are polished and difficult to paint. You may need to sand the stones, prime the stones, apply several coats of paint, and sometimes leave them outdoors for many months to "weather" them prior to painting.

An alternative to painting these stones is to engrave them first using an electric engraver tool (e.g., Dremel).

This video shows how to use this engraving tool on polished stones. In fact, engraving works best on the polished stones.


I've put this tool on my wish list so I can get even more creative with all the polished stones I've accumulated.