Wednesday, December 31, 2014

Before and After Painted Rocks: Christmas Holiday

Now is the time to put Christmas decorations away until next year.

Flip a triangular or heart-shaped stone upside down and it's the perfect shape for Santa's hat and beard.


A kidney-shaped stone worked well for painting Father Christmas.


Rectangular, flat stones were used for each of these Nutcrackers.


A triangular-shaped stone was perfect for a kitty in a Santa hat...


...and a puppy in a Santa hat too.


A round piece of slate and a small, oval stone were glued together to create a melting snowman.


Learn How to Make a Melting Snowman with Painted Rocks

See More Before & After Painted Rocks


© Cindy Thomas Painted Rocks

Monday, December 8, 2014

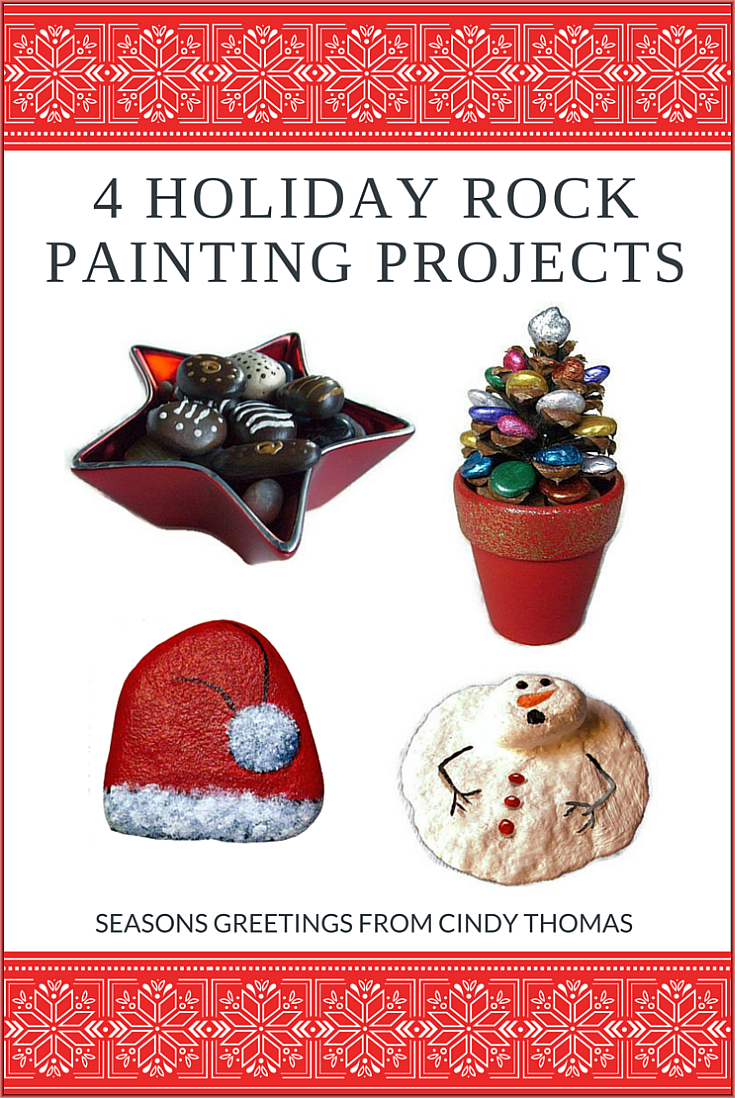
Christmas Holiday Painted Rocks Projects

Are you stumped and don't know what to gift a friend who has everything? How about a rock hand painted by you?

Are you looking for projects to keep the children busy during their break from school? How about an afternoon of painting rocks?

My gift to you is four holiday rock painting projects which are easy and fun for all ages to make, give and receive.


* * * * *
 

Sweet, Simple Gifts - No-Fat Rock Candy


Painted rock candies are a sweet gift to have on hand around the holidays and very easy to paint.

Learn How to Paint Rock Candy

 * * * * *

How to Paint a Santa Hat on Rocks and Stones


Painted Santa hat rocks make cute DIY Christmas gifts which are easy enough for children to paint and fun for all ages to give and receive.


Learn How to Paint a Rock Santa Hat

* * * * *

How to Make a Melting Snowman with Painted Rocks


"Build" this snowman in the warmth of your home instead of braving the cold, frosty outdoors.

Learn How to Paint a Melting Snowman on Rocks

* * * * *

How to Make Christmas Trees with Pine Cones and Painted Stones


Collect a few pine cones and use them with small, painted rocks to create a Christmas tree. 

Learn How to Paint a Pine Cone/Stone Christmas Tree

* * * * *

Merry Christmas, Everyone!

© Cindy Thomas Painted Rocks 

Thursday, November 27, 2014

Thanksgiving Turkeys Painted on Rocks

Cookie designs provided inspiration for these easy, Thanksgiving holiday painted stones.


Cookie designs are fabulous for easy rock painting projects because (in many instances) the decorating how to's can be adapted to rock painting.

The first turkey I painted used this Super Simple Turkey Cookies design. I added "Happy Turkey Day" on the reverse side.


This next painted rock turkey was a little more detailed and used this Decorated Turkey Cookies design. I painted "Gobble Gobble" on the reverse side.


The final Thanksgiving turkey was the most detailed of the three. I adapted this Easy Turkey Platter design for this painted stone.


After turkey dinner, this would be a fun project for the kiddos. I suggest sketching the designs on rocks first and then letting the children paint them.

Of course, if you're not a painter, bake the cute cookies instead or even do both!


© Cindy Thomas Painted Rocks

Thursday, November 13, 2014

Rock Painting Ideas: Slimy Critters Painted on Rocks

To get my creative juices flowing, I have a new Pinterest inspiration board. It features ideas and patterns for painting fish, frogs, turtles, snakes, lizards, snails and other slimy critters on rocks, stones and pavers.

 
Ideas: Slimy Painted Rocks


Not only can you transform a rock into a critter but you can also paint a fish pond on a piece of slate.


* * * * *

Visit my Pinterest Rock Painting Ideas and Helps board for more tips, tricks, ideas, and patterns to use for painting rocks, stones and pebbles.


© Cindy Thomas Painted Rocks

Friday, November 7, 2014

How to Ship Painted Rocks

The Holidays are quickly approaching and this is what I've learned about shipping painted rocks within the United States.


Preferred Supplies

U.S. Postal Service flat rate, priority mail shipping boxes
Parchment paper
Packing peanuts, newspaper, bubble wrap, etc.
EZ Start Packaging tape by Duck Brand

The Shipping Box

US Postal Service Flat Rate Shipping is a fantastic service when you're sending rocks within the United States - "if it fits, it ships" up to 70 pounds.

There are several flat rate box sizes to choose from - small, medium and large; I mainly use the small and medium boxes.

Regional flat rate priority mail is also available and the cost may be lower in some instances. The Regional Box A1 size is larger than the small flat rate box with a weight limit of 15 lbs. The price ranges from $6.01 to $14.95 depending on shipping distance. Package tracking and insurance up to $50 are included free. Postage for the Regional boxes must be purchased online at www.usps.com.

You can pick up a few boxes at your local post office or, if you're sending many shipments, you can order the boxes online. They cost nothing and are shipped free to your address. It's always nice to have a stash on hand when you need them.

Packing the Box

I made an early mistake of wrapping the painted stones in tissue paper or bubble wrap and learned these can "stick" to the painted stones. This won't happen with parchment paper.

I purchase my parchment paper at Sam's Club - 205 square feet costs less than $6 - a steal compared to what you'll find in the grocery store.

My painted stones are wrapped with parchment paper first then overwrapped with pretty tissue paper or wrapping paper.

Packing peanuts, newspaper, brown packing paper and bubble wrap are used to insulate the rock and prevent movement within the box. I save the packing materials from shipments I receive and reuse them with my painted rocks packages. Or, you can purchase the packing supplies at Walmart or your local office supply store.

Note: When you click on certain links in this post, I may receive a commission for the purchase of products.  


Sealing the Package   

I prefer EZ Start Packaging Tape which I purchase at Walmart.

In the early days, I would purchase packing tape from the dollar store. After fighting with the tape and wasting much of it, I decided to pay a little more and use a tape which unrolls smoothly and easily.

"Duck Brand EZ Start Packaging Tape is a frustration-free, high-performance packaging tape. EZ Start technology unrolls smoothly and easily. It won't split or tear, and you'll never have to worry about losing the tape end."


Sending the Package 

My shipper preference is USPS Priority Mail Flat Rate because: 
  • I can print the mailing label online at USPS.com
  • Package tracking is free
  • Insurance up to $50 is free
  • I can schedule a package pickup
  • The delivery time is generally 2-3 days from the date of mailing (however, it is not guaranteed)
You can take your priority mail package to the post office and pay for shipping at that time. However, I prefer to pay for and print my labels at home. By doing this, I'm able to save a little money on the cost of the shipment and I can schedule a package pickup right at my door.

You'll need to set up an account at USPS.com if you don't already have one in order to take advantage of the online label printing and package pick up.
  • Postage payment is made using a credit card or PayPal
  • Shipping labels are in PDF format and can be saved to your computer and printed at a later time
  • You can schedule a pickup for your package when you create the label and you won't have to schlep to the post office.  


Tips from Other Rock Painters

From Betty H: "...since the post office has lost a few packages I have sent I now make sure I pray over my packages, & ask that the angels guard them, & deliver them speedily, & they have all arrived at their destination quickly."

From Lisa C.:"1) BOX REINFORCEMENT: The flat rate boxes are constructed with suspiciously thin cardboard. I recommend reinforcing the tops and bottoms of boxes with extra cardboard when shipping heavy rocks. Recycled/previously used shipping boxes can be used for reinforcement. I recommend always adding extra tape on all seams for added structural support. 2) On occasion I've run into the situation where the rock will not fit comfortably in the small flat rate box without leaving a large bump on the top of the box due to the rock shape. In this instance, instead of going to a larger box I secure the small flat rate box the best I can ...then place this bulky box into a Priority Mail Flat Rate Padded Envelope. It's very secure this method and only ships for .20 cents more instead of going up to say medium flat rate box pricing."


Useful Link
U.S. Postal Service Rate Changes Effective January 17, 2016
U.S. Postal Service Priority Mail Information

© Cindy Thomas Painted Rocks 

Thursday, October 16, 2014

Rock Painting Tips for Beginners


Where to Find Rocks

For many of us, rocks are plentiful in our environment and free for the taking. If you have difficulty finding stones to paint, you can:

Note: When you click on certain links in this post, I may receive a commission for the purchase of products.
As an Amazon Associate I earn from qualifying purchases.
Stones purchased from Home Depot

I do not condone removing rocks from government lands or parks or a residence or business which has been landscaped with rocks. 


How to Prepare Rocks and Stones for Painting

You will need to clean and (in some cases) prime your rocks prior to painting. Read more about this tip.

Learn how to prepare stones for painting
 
How to Make Stones Stand Upright

If your rock is wobbly and you would like it to stand upright, read this tip for adding a base.

Learn how to add a base to stones
 
What Are the Best Brushes for Rock Painting?

You can use any brush to paint rocks (and I have many) but I keep returning to the same three brushes. Learn about my favorite brushes.

Learn about my favorite brushes
 
What Type of Paint is Best for Rocks and Stones?

Acrylic paint and craft acrylic both work well on rocks. The difference between them is the craft acrylic is thinner and more paint applications may be necessary. Learn about specialty paints you can also use on rocks.

Learn about specialty paints for rocks
 
Can I Use Sharpies on Painted Rocks?

Regular Sharpie markers smear and change color when a sealer is applied. Learn about paint pens suitable for rocks.

Learn more about these paint pens


How to Correct Mistakes on Painted Rocks

Learn how to fix a mistake while painting a rock and after it's finished (but before it's been sealed).

Learn how to fix mistakes on painted rocks


How to Seal and Protect Painted Rocks

Painted rocks beg to be picked up and admired and by applying a sealant, the colors remain true and the life of the painted rock is extended.  


How to Display Painted Rocks - Store-Bought and DIY Solutions

You can display painted rocks by using wooden, metal and plastic display easels, a plate stand, or DIY stand made from drapery slip-on hooks. Learn how to make your own display stand and see other options here.  


Optional Household Items


Can't Draw? No Problem
Create colorful painted stones with this no-draw technique.

Learn how to paint these stones - no drawing required

You  can trace a pattern onto a rock and paint it.

Learn how to trace a pattern onto a rock
 
Where to Find Rock Painting Ideas
Note: When you click on certain links in this post, I may receive a commission for the purchase of products.
As an Amazon Associate I earn from qualifying purchases.


My Favorite Tools and Supplies

I use these tools and supplies regularly to paint rocks and recommend them. (I may receive a commission for the purchase of products when you click on certain links in this post.)


© Cindy Thomas Painted Rocks

Friday, October 10, 2014

Website for Everything Cindy Painted Rocks

It occurred to me I needed a "hub" to make it easier for you to quickly find my rock painting information.

So, I created...
 
www.CindyPaintedRocks.com

From this "hub" site you can easily get to my:
  • Rock painting blog where I share rock painting tips, ideas, and inspiration
  • Facebook page where you can see my current painted rock projects and interact with myself and others in "real time"
  • Pinterest boards where I collect rock painting ideas and share rocks painted by myself and others
  • Flikr gallery where I regularly add photos of the rocks I've painted
  • He is my Rock where you can learn about the unique nativity sets, scenes and figures I paint on rocks and stones
  • Online store where you can purchase my hand-painted rocks and stones
 

Go to CindyPaintedRocks.com and bookmark the site so you can quickly and easily:
  • Find new rock painting ideas and inspiration
  • Read more about me and how rock painting has changed my life and affects me daily
  • Contact me
© Cindy Thomas Painted Rocks

Thursday, September 18, 2014

Before & After Painted Rocks: Things with Wings

These are a few of my favorite winged things.

Three, smooth, dark-colored Mexican beach pebbles were primed with white acrylic paint and transformed into Angel Babies.


One pitted and one smooth rock became pigs with wings garden decor.

See More Photos of Flying Pigs Rocks


I purchased these Caribbean beach pebbles by the bag and love them for rock painting. The stones are smooth and many of the shapes are perfect for owls.

See More Painted Birds Rocks


A large, 10-pound rock was the perfect shape for a life-size hen.

See More Photos of this Red Rock Hen Coming to Life


What's a hen without some chicks? Egg-shaped stones became my version of "peeps."


See More Before & After Painted Rocks

© Cindy Thomas Painted Rocks

Thursday, September 11, 2014

How to Make "Gem" Stones

I wanted to make a garden ball but did not have an old bowling ball handy. Then it occurred to me, 

"Why not attach glass gems to rocks?"


So, I did a little experiment using a small, pitted rock and two different adhesives I had on hand:

E6000 Craft Adhesive


Pros: Once thoroughly dried, the E6000 had a good, tight seal and there were no globs around the base of the gem.

Glass gems attached with E6000 adhesive

Cons: It was smelly, messy and the gems slid out of place unless I held them until they set (around 15 minutes). To cover the entire rock, the E6000 would be very impractical. Who has the time to hold each gem in place until it sets?


GE Silicone II

Make sure to use the silicone which is waterproof, clear, and made for outdoors – either for gutters and flashing or windows and doors.


Pros: The silicone is thicker than E6000 and the gems stayed in place more easily (however, gravity may still cause some to slide). Even though my silicone was 1 year past the expiration date, it still held the gems and the smell was less intense than a fresh tube.

Glass gems added to pitted rock with silicone adhesive

Cons: Globs of silicone showed around the base of each gem and the adhesive stays somewhat rubbery when dried. The globs may be avoidable if the gems are tightly spaced or a smaller amount of silicone is used. A fresh tube of silicone will be smelly (like ammonia.)


My Preferences


For attaching gems to rocks: I will use the silicone. The stones didn't slide around as much (if at all). I could use the tube like decorating a cake and make designs on the rocks.

For attaching stones together: I will use the E6000. I think the hold would be much better and the look cleaner than blobs of silicone around the glued pieces.

For a more eye-catching "gem" stone: I'll paint the rock first.

Which adhesive held up better outdoors?  

This blog post will be updated in Spring 2015 after the "gem" stones have been outdoors and exposed to the sun, sprinklers, rain, snow, wind and dust.

In the meantime, the "gem" stones add bling to my garden. (But now the other rocks and pavers look oh, so boring.)

"Gem" Stones in the Garden

Update: Spring 2015


After being outdoors all Winter and exposed to wind, rain, dust, and snow, the "gem" stones held up beautifully. I took this photo after I removed them from the garden and just brushed off the red mulch. All the gems were still strongly attached on both the silicone and E6000 stones. And, the "gem" stones don't look much different then the day I originally placed them in the garden.

Photo Taken Spring 2015 - "Gem" Stones Are Fresh Out of the Garden
 
I'm definitely making more of these!

Useful Resources


© Cindy Thomas Painted Rocks

Thursday, August 21, 2014

10 Rock Painting Projects for Kids


If you're new to rock painting, a helpful resource is Lin Wellford's "Painting on Rocks for Kids."


Whether you're a kid, parent or grandparent, you'll find all the information you need to get started with rock painting.


You'll Learn About
  • Tips for painting rocks
  • Types of brushes, paint, and other recommended supplies
  • Where to find rocks

 Each Easy-to-Follow Project

  • Lists the supplies you'll need
  • Illustrates the shape of rock to use
  • Guides you step-by-step with clear, color photos, drawings, and written instructions
  • Gives you ideas for variations of the project

Project How-To's Included in "Painting on Rocks for Kids"
  1. Go Fish
  2. Rocky Roadsters
  3. Lazy Lizards
  4. Flower Power
  5. Rockosaurs
  6. Go Buggy!
  7. Sandbox City
  8. Playful Food
  9. Mystery Eggs
  10. Bookend Bears


Find out more about Painting on Rocks for Kids


Other Rock Painting Guides by Lin Wellford
Note: When you click on certain links in this post, I may receive a commission for the purchase of products. As an Amazon Associate I earn from qualifying purchases.

© Cindy Thomas Painted Rocks