Many items found around the house can be used for drying painted rocks.
Binder Clip - A large binder clip can be used to dry thin, painted rocks.
Foam Egg Carton - Rocks can be propped up in the carton or laid across the sections.
Regular Egg Carton - Same as foam - prop up the painted rocks or lay them across the sections.
Lazy Susan - For larger rocks which stand upright on their own, I use a Lazy Susan for painting, sealing and drying the painted rock. (I like to line the Lazy Susan with parchment paper to provide a non-stick surface.)
DIY Drying Rack - If you're handy with a hammer and nails, you can create this drying rack for your painted rocks.
Clear Carpet Runners - Flip over a carpet runner and use the gripper (pointy) side to dry lighter-weight rocks. (Instead of buying an entire runner some home improvement stores sell it by the foot.)
You can display painted rocks by using wooden display easels, a plate stand, or DIY stand made from drapery slip-on hooks.
I found these wood veneer folded easels at Hobby Lobby and they nicely and attractively hold the the weight of painted rocks. They are available in 3, 5, 7, 9 and 12-inch sizes with a black or walnut finish. Regularly priced from $1.99 to $7.99, Hobby Lobby often has them available for 50% off. (Note: if your rock is too heavy, it may spread the stand's feet, making the stand unsuitable for that stone.)
Painted Stone is Displayed on a 3-Inch Folding Easel
For larger and heavier painted rocks, an art-style display easel or metal plate stand is a better choice. Both of these stands were purchased at Hobby Lobby at 50% off the regular price.
The Metal Stand (Right) is Displaying a 5-lb. Painted Rock
Artist, Marilyn Boyle, came up with this clever idea for DIY display stands using slip-on drapery hooks.
I have tried 3 types (brands) of slip-in drapery hooks and learned they are not created equal when it comes to shaping them into stands for painted rocks.
The slip-in hooks are listed in the order of my preference:
The most expensive set costs around $3.99 at Bed Bath and Beyond for 14 hooks. It was the easiest to shape into a rock stand.
The medium-priced set costs around $2.49 at Hobby Lobby for 14 hooks (4 hooks were end hooks and could not be used as stands). It took more time to create a stand because of the 4 "legs" but it was fairly easy to bend and shape into a stand.
The lowest-price set costs around $1.97 at Lowe's for 14 hooks. The metal was thicker and more difficult to bend and shape into a stand. In addition the piece used as a back support (soldered to the "legs") would snap off if I was not careful.
(I am sure each hook type works well for hanging curtains and drapes.)
I'm fortunate to have an enclosed balcony for my painting studio. A wall of windows provides good light during the day and an inspiring view.
Shortly after I started painting in the enclosed balcony, I realized I needed somewhere
to store all paints, supplies and brushes in a way which was easily accessible and saved space. A carousel
was the perfect idea (purchased from Hobby Lobby). It was meant for a
table top but I sat it on the floor instead.
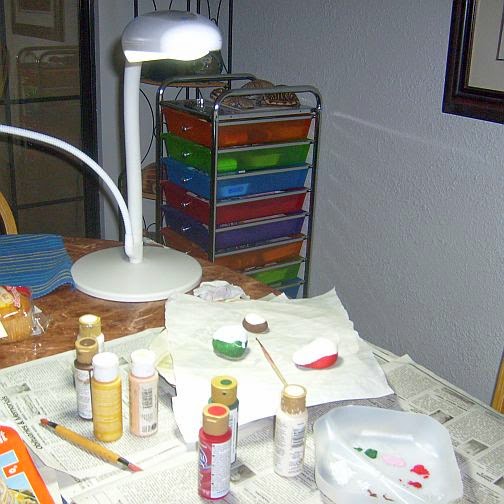
The wall of windows in my studio worked well until the sun set.
Without good lighting, I had to put off painting until the next morning. Then I discovered the Daylight Tabletop Magnifying Craft Lamp (available at Amazon, Jo-Ann Fabric and Craft Stores, Walmart).
Note: When you click on certain links in this post, I may get paid for the purchase of products. As an Amazon Associate I earn from qualifying purchases.
The daylight lamp enabled me to paint at all hours of
the day or night. (The magnifier takes some getting used to and will
come in handy one day.)
I love my daylight lamp and the paint carousel worked fine until my paint collection
expanded and my desire for organization (and keeping like colors with
like) put me in the market for something new.
I found this 10- drawer organization cart with multicolor drawers at Sam's Club for under $30. (The drawers also come in black and clear.)
...each drawer had more than enough room to store my paints. (I used egg cartons as temporary organizers.)
The daylight lamp and rolling cart not only solved my evening painting and organization dilemma. It also proved invaluable when Winter weather arrived and my enclosed balcony was too cold to spend much time in. I just rolled my paint cart into the dining room and tucked it into a corner for easy access. The tabletop daylight lamp didn't take up much room on the dining table.
Are you wondering what happened to the paint carousel? It became a storage spot for some of my smaller, painted rocks. (And yes, those are egg cartons used as organizers.)
I'm looking forward to warmer weather so I can move my lamp and rolling cart back into the enclosed balcony again. I miss the view!
Note: When you click on certain links in this post, I may get paid for the purchase of products. As an Amazon Associate I earn from qualifying purchases.
Nothing says "I love you" more than a hand-made gift. These rock painting projects and ideas are unique and whimsical ways to show your love on Valentine's Day and warm the recipient's heart.
Note: When you click on certain links in this post, I may receive a commission for the purchase of products. As an Amazon Associate I earn from qualifying purchases.
Step 1: Once inspiration hits, I start looking for the shape of rock I need. In this case, I had the perfect stone which eerily resembled a skull.
Step 2: I primed the rock with white acrylic paint and allowed it to sit for a while. As I walked past the primed stone, I started to visualize how I wanted to paint it. Step 3: I decided where facial features would best fit on the rock to allow a large, brain section and then painted only the face portion. (Because I'm not a portraitist, I found many how-to guides for drawing/painting faces on Pinterest.)
Step 4:For a little bling, I used E6000 craft glue to attach earrings onto the stone. (These were small, flower-shaped beads I had from an earlier project.)
Step 5: I spent a few days putting thoughts on paper to gauge the number and size of each brain section I planned to paint.
(For other rock painting projects, I've used a piece of paper or computer paint program to sketch my designs and test paint colors prior to committing it to the rock.)
Step 6: I started painting the sections - sized according to what I recorded on paper earlier.
Step 7: Sharpie fine-point markers were used to fill in each painted section with words. (Note: I generally don't use Sharpies because they can bleed and change color when sealed. But in this case, it would have been very difficult to use paint and brush to write my words.)
Step 8: I continued filling in all the sections with my rock-painting thoughts.
This video shows each angle of the completed "Rock Painter's Brain."
Now I have my 2015 rock painting goals set in stone.