Showing posts with label craft. Show all posts

Thursday, February 19, 2015

Ideas for a Small Rock Painting Studio

I'm fortunate to have an enclosed balcony for my painting studio. A wall of windows provides good light during the day and an inspiring view.


Shortly after I started painting in the enclosed balcony, I realized I needed somewhere to store all paints, supplies and brushes in a way which was easily accessible and saved space.

A carousel was the perfect idea (purchased from Hobby Lobby). It was meant for a table top but I sat it on the floor instead.


The wall of windows in my studio worked well until the sun set. Without good lighting, I had to put off painting until the next morning.

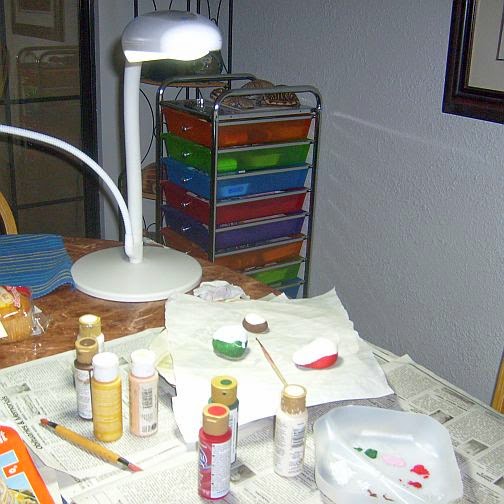
Then I discovered the Daylight Tabletop Magnifying Craft Lamp (available at Amazon, Jo-Ann Fabric and Craft Stores, Walmart).

Daylight Table Top Craft Lamp, White

Note: When you click on certain links in this post, I may get paid for the purchase of products. As an Amazon Associate I earn from qualifying purchases.


The daylight lamp enabled me to paint at all hours of the day or night.  (The magnifier takes some getting used to and will come in handy one day.)


I love my daylight lamp and the paint carousel worked fine until my paint collection expanded and my desire for organization (and keeping like colors with like) put me in the market for something new.

I found this 10- drawer organization cart with multicolor drawers at Sam's Club for under $30. (The drawers also come in black and clear.)

10-Drawer Rolling Cart
The cart was easy to assemble and...


...each drawer had more than enough room to store my paints. (I used egg cartons as temporary organizers.)


The daylight lamp and rolling cart not only solved my evening painting and organization dilemma. It also proved invaluable when Winter weather arrived and my enclosed balcony was too cold to spend much time in.

I just rolled my paint cart into the dining room and tucked it into a corner for easy access. The tabletop daylight lamp didn't take up much room on the dining table.


Are you wondering what happened to the paint carousel? It became a storage spot for some of my smaller, painted rocks. (And yes, those are egg cartons used as organizers.)


I'm looking forward to warmer weather so I can move my lamp and rolling cart back into the enclosed balcony again. I miss the view!


Helpful Links
Note: When you click on certain links in this post, I may get paid for the purchase of products. As an Amazon Associate I earn from qualifying purchases.

© Cindy Thomas Painted Rocks

Tuesday, April 23, 2013

How To Mod Podge a Napkin onto Rocks


I was saving a pretty napkin for a craft project and decided to try Mod Podging it onto a large rock. (I love painting rocks and stones but wanted a break from detailed painting.)


First, I cut a design from the napkin that would fit best on the rock.


Then I used a brush to paint a thin coat of Mod Podge on the rock and pressed the napkin design carefully onto the rock.

Next I applied a coat of Mod Podge over the design.

PROBLEM: I could not smooth the wrinkles from the Mod Podge-saturated napkin without tearing it.

So, I left the wrinkles/bubbles.

Napkin design Mod Podged onto large rock

Maybe less is more? I decided to use smaller designs and smaller stones following the same steps as above.

This time I was able to smooth the Mod Podge-saturated napkin without tearing it.

Napkin design Mod Podged onto small stones

SOLUTION: When Mod Podging portions of a napkin onto a stone, smaller is better


Tips & Ideas:
  • Look for pretty napkins with small designs that would fit nicely on small stones
  • Work carefully once Mod Podge is applied to the napkin design to avoid tearing
  • My fingers worked best for smoothing the napkin after the Mod Podge was applied
  • Once the saturated napkin has dried, you can sponge paint around the edges (like the 2 green stones pictured above on the lower right)
  • For no-skill-required painting, Mod Podge the napkin design onto a stone and apply paint over it (using the design as a guide) so the rock will now look painted rather than Mod Podged
  • Add a few paint strokes in strategic spots or use 3-D fabric paint strategically for added dimension and interest
  • For a child's party, buy extra theme napkins and Mod Podge them onto stones as a party favor


© Cindy Thomas Painted Rocks

Monday, January 14, 2013

How to Create Valentine's Day Gifts of Painted Love Bug Rocks

Valentine's Day will be here before you know it. Instead of giving a card, give gifts of painted rock love bugs.

painted rocks, love bugs, holiday, Valentine's, rock painting
Say Happy Valentine's Day with a Gift of Love Bug Painted Rocks


What you'll need:
  • Round rocks - plump or flat
  • Acrylic paints
  • Brushes
  • Valentine Love Bugs free how-to lesson 

Love Bug painted rocks would certainly warm the heart of that special Valentine both young and old.

painted rocks, love bugs
Love Bugs Painted on Rocks

But, you can make these gifts more personal and special:
  • Place the painted love bug rocks in a Valentine-themed container
  • Use Valentine-themed padding in the container

painted rocks, love bugs, Valentine's

Tip: Visit your local craft, dollar or thrift store for Valentine-themed containers and accessories (red baskets, bowls, dishes, mugs, fabric, wrapping paper, etc.) to customize your Love Bug Valentine gifts.


Idea: Purchase a box of chocolates and replace one of the chocolates with a brightly-colored Valentine Love Bug.  However, keep the recipient in mind. You don't want them to try to eat the stone!


Of course, Love Bug rocks aren't just for holidays. You can warm hearts any time of the year with painted Love Bug rocks.


Painted rock candies are another easy gift idea for Valentine's Day.

Tuesday, October 30, 2012

DIY Craft Paint Storage Idea

My craft paint carousel worked well for a time, however, the weight of the paint, brushes, sealers, etc. has now made this storage solution wobbly.

My current paint storage solution - a wobbly carousel

Here's a clever idea for storing craft paint so it's easy to see and grab the desired color.

How to Organize Craft Paint on a Cabinet Door

For around $30 you can make this handy craft paint storage project.

Click here for the tutorial.

Now that I've seen this DIY storage idea, I'm motivated to try something similar to get my craft paints organized and easy to grab for my rock painting.  


Tuesday, April 17, 2012

What Can I Do with a Stony Face Painted on Rocks?

Once you paint a Stony Face on rocks, you'll find many ways to have fun with him (or her). Here's one example.

We all have refrigerators and many of us use refrigerator magnets. Parents love to showcase their child's artwork on the fridge. Children love to do craft projects that they can proudly display.

A painted rock Stony Face can become refrigerator magnets. Eyes up, eyes down, eyes crossed. You and/or your children can express yourself on a refrigerator's canvas by rearranging the eye, nose and mouth features of the Stony Face.

Stony Faces on Refrigerators
Need guidance on How to Paint Stony Face on Rocks? There's a PDF version and a Kindle eBook version that instruct and illustrate how four basic eye and mouth patterns enable you to make over 100 facial combinations to have fun with.

Monday, April 16, 2012

Rock Painting How-To Guide Now Available for Amazon's Kindle Ebook Reader

how to, rock painting, idea, Stony Face, painted rocks, Amazon, Cindy Thomas
Click here for the Kindle version.

The Kindle version of the craft painting book, How to Paint a Stony Face on Rocks, includes access to a full-size, full-color, printable PDF version of this project which can be downloaded to any computing device for easy printing. 

This is an easy, rock painting project for both kids and adults using ordinary stones and acrylic paint.


© Cindy Thomas Painted Rocks

Thursday, April 5, 2012

Hand Painted Rocks Become Stony Faces

I recently had some fun painting simple facial features on various sizes of rocks and stones. I called my new creation Stony Face.

painted rocks, faces, rock painting, Cindy Thomas
Stony Face Painted on Rocks

I then had an idea and even more fun rearranging the eye and mouth rocks I painted to create five additional funny Stony Faces.

faces, rock painting, painted rocks, Cindy Thomas
5 Different Stony Faces from 1 Set of Painted Rocks

Then I was inspired to paint more detailed mouths on some rocks and ended up with these LOL rocks that I could use with the basic Stony Face from my earlier project.

mouths, faces, painted rocks, rock painting, Stony Face, Cindy Thomas
LOL Painted Rocks for Stony Face

Finally, I decided to record all the steps I took to create the basic Stony Face, added 3 more simple eye and mouth patterns, and made a Stony Face rock painting how-to guide.

how to, rock painting, faces, painted rocks, ideas, Cindy Thomas
How to Paint a Stony Face on Rocks

The Stony Face craft project is easy enough for beginner rock painters. Simple, step-by-step instructions, illustrations and photos guide you in selecting the rocks, drawing and painting the mouth and eyes, and arranging your painted rocks into funny faces. The 4 basic mouth patterns and 4 simple eye patterns can be combined to create over 100 unique, one-of-a-kind Stony Faces.

This is an easy, fun, inexpensive, craft project for both kids and adults. It's amazing how a little acrylic paint and imagination can bring ordinary rocks to life.


© Cindy Thomas Painted Rocks