Showing posts with label kitty. Show all posts

Friday, June 29, 2018

Before & After Painted Rocks: Cats

Here are the rocks I used to paint various types of cats along with the sketches for the placement of the kitty's features.

Sleepy Kitty - A Flora Tan Design


White Persian Cat - A Suzi Chua Design


Orange Striped Tabby - A Suzi Chua Design


Black and White Cat - An Ernestina Gallina Design


Brown Persian Kitty - A Suzi Chua Design


How to Paint Cats on Rocks Tutorials:
Note: When you click on certain links in this post, I may receive a commission for the purchase of products. As an Amazon Associate I earn from qualifying purchases.

© Cindy Thomas Painted Rocks

Saturday, June 29, 2013

Rock Painting Tip: Use Paint Pens Instead of a Brush for Detailing

Sometimes my rock is too small or my hand too unsteady to paint fine details with a brush. Regular Sharpie markers smeared and changed color when a sealer was applied. Micron pens scraped the paint off my rock and dried up quickly.

Update: Monday, October 24, 2016

Since the date of the original post, I have discovered the Uni Posca marker and consider it the best pen/marker for rock painting. This post has now been updated to include the Posca pen. (Click here to see my experiments with the Posca Pen.)


Four pens suitable for rock painting are the: 
Note: When you click on certain links in this post, I may receive a commission for the purchase of products.
As an Amazon Associate I earn from qualifying purchases.


While only one of these pens is my perfect solution, they all enable me to add details to my painted rocks without using a brush.

I drew a simple kitty using each pen to illustrate how they perform on a rock. (FYI: Smooth stones are easier to draw on than pitted stones.) 


Uni Posca Marker (water-based paint filled)


Uni Posca Marker - My Perfect Rock Painting Pen

 Pros
  • Available in various colors
  • Many tips available from extra fine point to extra broad
  • Can be used on unpolished and polished stones
  • Dries quickly
  • Does not blur or change color when sealer is applied
Cons
  • None


Elmer's Opaque Paint Marker (acrylic paint filled)


Elmer's Painters Pen
 Pros
  • Available in various colors
  • Fine tip available
  • Dries quickly
  • Doesn't smear or change color when sealer is applied
 Cons
  • Fine tip is not as fine as I'd like


Sharpie Oil-Based Paint Pen


Sharpie Oil-Based Paint Pen

Pros
  • Available in various colors
  • Fine & extra fine tips available
  • Dries quickly
  • Glossy
  • Doesn't smear or change color when sealer is applied
Cons
  • Fine tip is not as fine as I'd like (I have not tried the extra-fine tip)


Sagura Pigma Brush (archival ink)


Sakura Pigma Brush

Pros
  • Available in various colors
  • Dries quickly
  • You can control the thickness of the line by amount of pressure used when drawing
Cons
  • The kitty drawn with the Pigma Brush smeared when I applied a polyurethane varnish (Delta Ceramcoat)
Polyurethane sealer smeared my kitty design


Tip
  • After redrawing the kitty with the Sakura Pigma Brush, I carefully sealed the rock with a thin coat of Mod Podge first, then I applied the Delta Ceramcoat  
Apply Mod Podge first then polyurethane sealer when using Pigma Brush

I previously used three of these pens interchangeably but my new favorite is the Posca marker.


How to Prevent "Sharpie" Permanent Markers from Blurring When Sealed

Note: I may receive a commission for the purchase of products when you click on certain links. As an Amazon Associate I earn from qualifying purchases.

© Cindy Thomas Painted Rocks 

Tuesday, April 2, 2013

Simple Rock Painting Idea for Polished Stones


My problem: Polished stones are difficult to paint because of the smooth, slick surface. (The paint doesn't want to adhere to the stone.)


My simple solution for some of the prettier, polished stones like the group pictured above:

 
Polished Stone Kitties


How to Paint Kitty Cats on Polished Stones


My supply of polished rocks included small stones with a perfect shape for a cat's face, as well as larger, colorful stones to use for the body.

Step 1: Choose a large and small stone that closely match in color. (Small triangular or round stones work well for the face; round or oval shapes work well for the body.)

Step 2: Glue the small stone onto the large stone using E-6000 glue (or similar craft adhesive).

Attach the face stone to the body with E-6000 glue

Step 3: After the glue has dried, use 3-D fabric paint in various colors to add simple details for the face and body.


3-D Fabric Paint


Add simple details to the face and body

Step 4: To keep the paint from flaking off the stone(s) you'll need to seal the rocks:
  • First coat: Mod Podge (an all-in-one glue, sealer and finish)
  • Second coat: Delta Ceramcoat Varnish (to avoid stickiness of Mod Podge in high humidity) 


Sealer 1: Mod Podge - Sealer 2: Delta Ceramcoat Varnish

Update: I used the brush-on sealers pictured above for the cats pictured. Since the time of this post, I still use Mod Podge as a first coat, but I now prefer Americana Duraclear Satin Varnish for my second coat.

Tips
  • Before gluing the polished stones together, sand the area where they'll be attached. This will help the glue adhere better
  • Apply the glue to each stone and wait approximately 2 minutes before attaching the stones together
  • Press the stones together for a few minutes to make sure you have a good hold. (Be watchful of the stone sliding rather than adhering.)
  • You can use a brush instead of the 3-D paint tip for applying the details. This may give you more control on smaller stones  


Ideas
  • Tie a ribbon around the cat's neck
  • Add a little bell on thin elastic around the kitty's neck
  • Use this idea for painting other critters on polished stones
  • Display your painted stone pets in little baskets or no-sew bedding

Painted Rock Pets

A PURRfect solution for polished stones!


© Cindy Thomas Painted Rocks

Thursday, March 28, 2013

Painted Rocks: My Process for Creating Butterfly Kitty Cats


painted rocks, kitty, cat, eyes, Cindy ThomasMy creative juices started flowing the other day when I spied several flat, oddly-shaped stones in my rock pile.

The shapes and natural colors of these stones seemed ideal for painting half of a cat's face. The goal was to keep it simple with one eye-catching feature - the cat's eyes!


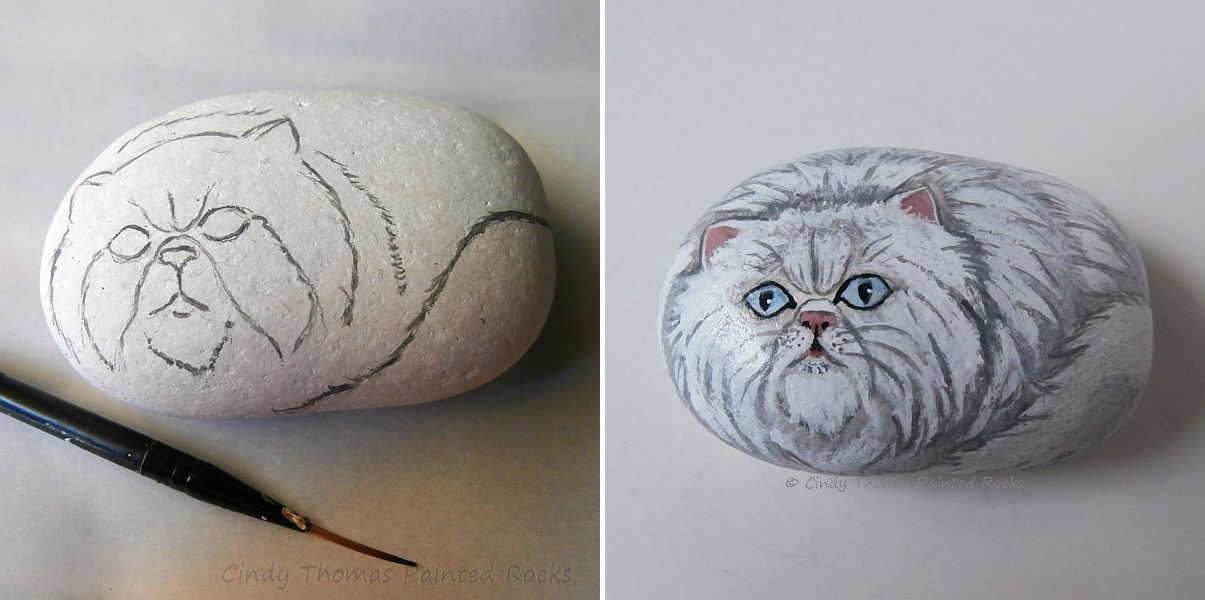
First, I traced the stone shape on a piece of paper and sketched my idea to see if it would work.

cats, stones, unpainted, rocks, design, sketch, idea
The initial design sketch


I was pleased with the effect and started painting my kitties with these two simple features:
  • A pinkish nose
  • White whiskers highlighted with gray

Because I was leaving most of the stone unpainted, I wanted my focal point to be each cat's eye.  I chose yellow, green and blue eye colors and added more detail to this specific facial feature for each kitty cat stone.

painted rocks, stones, cats, kitties, half, face, eyes
The eyes are the focal point on these painted stones

I liked the result and when I placed the two larger stones next to each other, I had an "Aha moment." Why not create a complete cat's face? I used my graphic viewer and flipped a 2nd image of the painted stone to complete each face. The kitty cat became symmetrical on both sides like a butterfly.

As you can see below, some stones worked better than others when creating a complete face.

painted rocks, cats, kitties, stones, rock painting, Cindy Thomas
Butterfly Stone Kitty Cats

It was a fun surprise to see each kitty's face after the original and flipped image were combined.

Ideas
  • Find stones that closely match in shape and size and paint left and right sides of the face. Then mix and match for funny kitty faces
  • Glue a half-face stony kitty to a stick and use for a bookmark or plant accessory
  • Instead of leaving the stone's natural color, paint the rock black, white, calico, etc. before adding the nose, whiskers and eyes.
  • Place a half-face kitty stone strategically in a garden so it looks like a cat is hiding among the greenery.
  • Use this technique with other critters also - e.g., owls, dogs, bunnies. 

 A PURRfect solution for oddly-shaped stones!

© Cindy Thomas Painted Rocks