Pages

Thursday, December 29, 2016

How to Prevent "Sharpie" Permanent Markers from Blurring When Sealed


After I found my perfect paint pen for rocks (which did not blur when sealed), I received a blog post comment which suggested "applying a layer of Elmer's Glue on the Sharpie Art, allowing to dry, before applying spray sealant."

I decided to try this out for myself but instead of using a spray sealer, I used two of my preferred brush-on sealers.

My first test used a Sharpie ultra fine point black permanent marker. I printed the words "Sharpie test" on my stone and followed it with a thin coat of white glue. After the glue dried, I applied a thin coat of Delta Ceramcoat brush-on sealer.

White glue applied over a Sharpie marker before Delta Ceramcoat sealer
Result: Neither the glue nor my sealer blurred the words written on the stone with a Sharpie permanent marker pen.

For my second test, I used colored Sharpie permanent markers and drew a simple design on a pitted stone. Once again, a first coat of white glue was thinly brushed over the design. Then after the glue dried, I used Americana Duraclear brush-on sealer.

White glue applied over Sharpie markers before Duraclear Satin Varnish
Result: Neither the glue nor my sealer blurred the design drawn on the stone with various colors of Sharpie permanent marker pens.

I'm happy to report that white glue (e.g., Elmer's) used over Sharpie permanent marker pens did indeed prevent blurs when applied prior to both formulas of my clear sealers. (Note: I used this trick on small stones and cannot say how well it works with large painted rocks.)

Give this tip a try for yourself and let me know what you think.

White Glue over Sharpies Prevents Blurring by Cindy Thomas

© Cindy Thomas Painted Rocks

Monday, October 24, 2016

The Perfect Paint Pen for Rocks

I finally found a pen to use on rocks that doesn't blur with sealer!

For awhile I've been searching for the perfect paint pen (marker) to use on rocks. The problem has been the ink smears and blurs when a sealer is applied and the nib has been too thick for a nice, thin line.

It's been suggested I try a Posca pen so I purchased a brown Uni Posca Extra Fine Marker. I was looking specifically for a pen which could make a thin line in a brown color. (Most Posca pens I've seen come in sets of various colors and I didn't want to spend money on an entire set until I knew how they would perform on rocks and stones.)
Note: When you click on certain links in this post, I may receive a commission for the purchase of products.
As an Amazon Associate I earn from qualifying purchases.


I watched this helpful YouTube video to learn about my Posca pen before using it - "Getting Started with Posca Pens - Part 1":


This is what the tip of my Posca extra fine marker looks like:


To test the pen, I painted a small, slightly pitted stone with acrylic paint. I then used the brown Posca marker to draw some simple facial features on the rock.


So far so good. I was happy with the light brown color and the thin lines the marker created.

Next, I brushed on Mod Podge as a first coat of sealer and the Posca marker lines held up beautifully on the rock - no blurring/smearing.


(Note: I prefer to use Mod Podge as a first coat sealer because there seems to be less of a reaction with paints. The Mod Podge is then followed up with Americana DuraClear Satin Varnish. Click here to learn more about how I seal my painted rocks.)

I then experimented by using the pen to add lettering to a rock. Because I'm a left-handed writer, I push the pen rather than pull it across the rock. The result was little dots of ink where the nib "dragged" against the rock. However, I was able to paint over the ink dots and sealed the stone with no adverse effects.


Another experiment involved using the Posca pen on a polished stone. Usually paint and pens will not adhere to polished stones, however, the Posca marker performed beautifully and did not smear with the application of Americana DuraClear Satin Varnish.


I'm hoping the Posca marker is the answer to my search for the perfect paint pen (marker) for rocks. However, using the Posca pen on three stones is not enough to declare it a success. I question how long the pen will last, will it leak, will the texture of rocks and stones affect the nib.

As I continue to use the Posca pen, I will update this post with any additional positive or negative aspects about the marker.

11/12/18 Update: Yes, Posca pens are wonderful to use on rocks. In fact, Posca pens and mandalas are meant for each other.


Note: When you click on certain links in this post, I may receive a commission for the purchase of products. As an Amazon Associate I earn from qualifying purchases.

Please leave a comment with any tips, praises or problems you've had with Posca pens. I'd love to hear what you think about this product.

Helpful Links:
Posca Instructions for Use
Brown Extra Fine Point Posca Pen
Individual Posca Pens for Sale in Various Colors
Set of 12 Extra Fine Point Posca Pens in Various Colors
Use Paint Pens Instead of a Brush for Detailing

Note: When you click on certain links in this post, I may receive a commission for the purchase of products. As an Amazon Associate I earn from qualifying purchases.

© Cindy Thomas Painted Rocks
Tuesday, June 14, 2016

Before & After Painted Rocks: Suns

In the 1970's, I made this sun wall hanging using yarn and burlap. After I left home, my sister saved Mr. Sun from the trash and now proudly displays him in her home and collects sun art. To thank her for reuniting me with a blast from the past, I offered to paint a sun rock for her collection.

Reunited with my wall hanging after 40 years


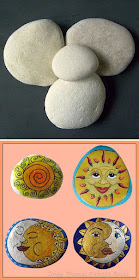
I used 4 different stones so I could paint 4 different sun designs.

Suns and Moons painted on rocks by Cindy Thomas


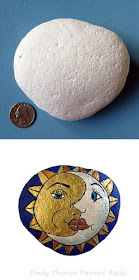
I started with the smallest stone and simplest design first - a stylized sun on one side and moon on the other.

Stylized sun and moon painted rock

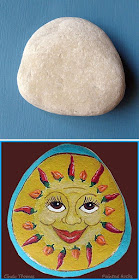
Both my sister and I live in the Southwest so hot chili peppers were the inspiration for this sun's design.

Painted Rock with Chili Pepper Sun Face by Cindy Thomas
Red Hot Mama Painted Sun Rock

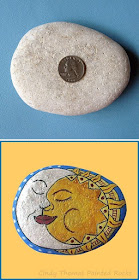
A Talvera Mexican ceramic tile was the inspiration for this painted rock sun.

Moon and Sun Faces painted on a stone by Cindy Thomas
Talavera Inspired Painted Sun Rock


Rocks don't have to be round for a sun & moon design. My sister liked this one the best and it's now a part of her collection.

Moon and Sun Faces painted on a rock by Cindy Thomas

© Cindy Thomas Painted Rocks

Tuesday, April 19, 2016

How I Fixed Two Stones Ruined by a Spray-On Sealer


Supplies I Used to Repair These Two Ruined Stones

When art pens or Sharpies are used on a rock, care must be taken when applying a sealer because the pens tend to blur or fade.

Applying thin coats of a spray sealer is usually effective in protecting the painted rock unless your spray sealer happens to drip as you're spraying. (This is the first time it has happened to me and may have occurred because I did not clean the nozzle after prior use.)

Here's what happened and how I fixed the stones.

I created these stones using acrylic paint for the colorful background and Pro Art pens for the mandala design.


I was sealing the stones using my preferred method and sealer, and the can's nozzle dripped while I was spraying thin coats onto the rocks. (The green stone survived but the design on the orange and blue stones blurred.)

Two of Three Stones Blurred by a Spray-On Sealer

Close-Up of a Design Blurred by Spray-On Sealer


My first thought was "Oh, no. I have to repaint the entire stone." But after mulling it over for a few days, I decided to "mend" the error and try another sealer recently suggested to me.

The first step was to paint over the blurred portions of the stones using my tiny nail art brush.


After the blurry, colored portion of the stone was repainted and dry, I re-drew the ruined mandala section with the Pro Art pen.


I didn't want to chance using the same spray sealer. Instead, I grabbed some clear nail top coat and brushed it over the stone. And the clear nail top coat didn't smear the design!

The Blue & Orange Stones Repaired and Sealed with Clear Top Coat for Nails
In the photo above, the green stone has the matte spray sealer and the blue and orange were sealed with the clear nail top coat. 


What I learned from this experience.
  • Clear top coat for nails is a suitable sealer for smaller rocks where a pen has been used.
  • Clean the nozzle on the spray sealer (per the can's instructions) otherwise it may drip and ruin the art.


Useful Links

Spray-On Sealer Tips
Brush-On Sealer Tips
Nail Art Brushes
Pro Art Pens

© Cindy Thomas Painted Rocks